<?xml version="1.0" encoding="utf-8"?>
<feed xmlns="http://www.w3.org/2005/Atom">
  <title>Linの博客</title>
  
  <subtitle>发泄一下我那多到爆棚的分享欲</subtitle>
  <link href="https://nmsl-blog.pages.dev/atom.xml" rel="self"/>
  
  <link href="https://nmsl-blog.pages.dev/"/>
  <updated>2026-01-24T12:22:28.020Z</updated>
  <id>https://nmsl-blog.pages.dev/</id>
  
  <author>
    <name>爱干饭的小林</name>
    
  </author>
  
  <generator uri="https://hexo.io/">Hexo</generator>
  
  <entry>
    <title>Talkatone 注册保号全攻略：低成本拥有美国号码与避坑指南</title>
    <link href="https://nmsl-blog.pages.dev/posts/2740156187/"/>
    <id>https://nmsl-blog.pages.dev/posts/2740156187/</id>
    <published>2026-01-24T12:22:24.924Z</published>
    <updated>2026-01-24T12:22:28.020Z</updated>
    
    <content type="html"><![CDATA[<h1 id="Talkatone-注册与使用全攻略（保姆级教程）"><a href="#Talkatone-注册与使用全攻略（保姆级教程）" class="headerlink" title="Talkatone 注册与使用全攻略（保姆级教程）"></a>Talkatone 注册与使用全攻略（保姆级教程）</h1><h2 id="📖-简介"><a href="#📖-简介" class="headerlink" title="📖 简介"></a>📖 简介</h2><p>Talkatone 是一款知名的 VoIP 通讯应用，主要用于获取免费的美国或加拿大电话号码。通过它，用户可以在 WIFI 或数据网络环境下，免费向美国和加拿大的号码发送短信和拨打电话。它是跨境电商、海外社媒运营（如 TikTok、Telegram 注册）以及需要接收海外验证码用户的常用工具。</p><h2 id="⚠️-核心前置条件（必读）"><a href="#⚠️-核心前置条件（必读）" class="headerlink" title="⚠️ 核心前置条件（必读）"></a>⚠️ 核心前置条件（必读）</h2><p><strong>Talkatone 的风控机制非常严格，注册成败的关键在于网络环境。</strong></p><ol><li><strong>纯净的 IP 环境</strong>：这是最重要的一点。Talkatone 对 IP 极其敏感，普通的数据中心 IP（机房 IP）或万人共用的 VPN 节点极易导致注册报错或秒封。建议使用<strong>美国原生住宅 IP</strong>。</li><li><strong>设备准备</strong>：<ul><li><strong>iOS</strong>：需使用美区 Apple ID 登录 App Store 下载。</li><li><strong>Android</strong>：需安装 Google Play 服务框架，并从 Google Play 商店下载。</li></ul></li></ol><blockquote><p><strong>特别提示</strong>：如果在注册过程中遇到未知错误、无法获取号码或注册后立即被封号，主要原因通常是 IP 质量不佳。</p><p>📧 <strong>如有 IP 使用问题，请邮件联系：<a href="mailto:vps@lin8177.top">vps@lin8177.top</a></strong></p></blockquote><hr><h2 id="🛠️-第一步：下载与安装"><a href="#🛠️-第一步：下载与安装" class="headerlink" title="🛠️ 第一步：下载与安装"></a>🛠️ 第一步：下载与安装</h2><p>由于 Talkatone 仅面向特定国家市场，国内应用商店无法直接下载。</p><ul><li><strong>iOS 用户</strong>：退出 App Store 的中国区账号，登录美区 Apple ID，搜索 “Talkatone” 下载。</li><li><strong>Android 用户</strong>：连接好网络环境，打开 Google Play 商店搜索下载。如果无法使用 Google Play，可尝试通过 APKPure 等第三方可信平台下载最新版 APK 安装包。</li></ul><h2 id="📝-第二步：注册流程"><a href="#📝-第二步：注册流程" class="headerlink" title="📝 第二步：注册流程"></a>📝 第二步：注册流程</h2><ol><li><strong>开启网络代理</strong>：将节点切换至美国模式（必须确保 IP 为美国 IP）。</li><li><strong>点击注册</strong>：打开 App，点击底部的 <strong>“Sign Up”</strong> 按钮。</li><li><strong>年龄确认</strong>：系统会询问你是否年满 16 岁，点击 “Continue” 确认。</li><li><strong>选择注册方式</strong>：<ul><li>建议选择 <strong>“Sign up with email”</strong>（用邮箱注册）。推荐使用 Outlook、Gmail、Yahoo 等国际邮箱，国内邮箱（如 QQ、163）可能被拒收验证码。</li></ul></li><li><strong>邮箱验证</strong>：输入邮箱地址后，你的邮箱会收到一个 4 位数的验证码。将其填入 App。</li><li><strong>填写信息</strong>：简单填写 First Name（名）和 Last Name（姓），可以用拼音或英文名。</li><li><strong>获取位置权限</strong>：App 会请求位置权限以分配号码，建议<strong>拒绝</strong>（选择 “Don’t Allow”），然后手动输入一个美国邮编（Zip Code），例如：<code>90001</code> (洛杉矶) 或 <code>10001</code> (纽约)。</li><li><strong>挑选号码</strong>：<ul><li>系统会列出一组号码供选择。</li><li>如果对号码不满意，可以点击 “Choose a different one” 刷新。</li><li>选中号码后，点击 <strong>“Get Number”</strong>。</li></ul></li></ol><p>🎉 <strong>注册成功！你现在已经拥有一个可以使用的美国号码了。</strong></p><hr><h2 id="📱-第三步：使用指南"><a href="#📱-第三步：使用指南" class="headerlink" title="📱 第三步：使用指南"></a>📱 第三步：使用指南</h2><h3 id="1-接打电话与发短信"><a href="#1-接打电话与发短信" class="headerlink" title="1. 接打电话与发短信"></a>1. 接打电话与发短信</h3><ul><li><strong>免费范围</strong>：拨打/发送给美国 (+1) 和加拿大 (+1) 的号码是完全免费的且不限时长/条数。</li><li><strong>收费范围</strong>：如果需要拨打其他国家的号码，需要充值 Credits。</li><li><strong>接听/接收</strong>：接听任何电话和接收任何短信（包括验证码）都是免费的。</li></ul><h3 id="2-接收验证码技巧"><a href="#2-接收验证码技巧" class="headerlink" title="2. 接收验证码技巧"></a>2. 接收验证码技巧</h3><p>在注册 TikTok、Telegram 或 WhatsApp 时，填入 Talkatone 分配的号码。App 收到短信会有弹窗提示。如果长时间未收到，请检查 App 内的 “Voicemail” 或垃圾短信箱。</p><p><em>注：极少数金融级高风控 App 可能会识别出这是 VoIP 虚拟号码而拒绝发送验证码，这是正常现象。</em></p><h3 id="3-如何解决-“911-Address”-弹窗"><a href="#3-如何解决-“911-Address”-弹窗" class="headerlink" title="3. 如何解决 “911 Address” 弹窗"></a>3. 如何解决 “911 Address” 弹窗</h3><p>首次进入或偶尔使用时，App 会弹出 “Update your 911 address” 的提示。这是美国法律要求 VoIP 服务商必须提供的紧急救援定位。</p><ul><li><strong>处理方法</strong>：点击 “Add” 或 “Update”，在 Google 地图上随便找一个美国的真实地址（如某家酒店或星巴克），填入街道、城市、州和邮编即可消除弹窗。</li></ul><hr><h2 id="🛡️-第四步：保号策略（非常重要）"><a href="#🛡️-第四步：保号策略（非常重要）" class="headerlink" title="🛡️ 第四步：保号策略（非常重要）"></a>🛡️ 第四步：保号策略（非常重要）</h2><p>Talkatone 的号码并非永久拥有。如果你长时间不活跃，号码会被官方回收。</p><ol><li><strong>保持活跃</strong>：<ul><li>建议<strong>每週至少打开一次 App</strong>。</li><li><strong>每 30 天内至少产生一次通话或短信</strong>。</li><li><em>小技巧</em>：你可以拨打美国 Apple 客服电话 <code>+1 (800) 275-2273</code> 或 Microsoft 客服，接通几秒钟即可算作活跃使用。</li></ul></li><li><strong>💎 积分保号（高性价比推荐）</strong>：<ul><li><strong>机制</strong>：如果在 30 天内不活跃，Talkatone 会尝试从你的账户中**扣除 30 点 Credits（积分）**来自动维持号码。如果积分不足，号码才会被回收。</li><li><strong>操作</strong>：你可以花费 <strong>$0.99</strong> 在 App 内购买 60 点 Credits。</li><li><strong>算账</strong>：$0.99 = 60 积分 = 2 个月的保号保险。相当于仅仅花费 <strong>$0.5/月</strong> 就能给号码上一道保险，即使忘记活跃也不用担心号码丢失，非常划算。</li></ul></li><li><strong>订阅服务</strong>：<ul><li>通过内购 “Talkatone Plus” 服务（约 $3.99/月），可以锁定号码并移除广告。但对比积分保号方案，性价比略低。</li></ul></li></ol><hr><h2 id="🚫-注意事项与常见问题"><a href="#🚫-注意事项与常见问题" class="headerlink" title="🚫 注意事项与常见问题"></a>🚫 注意事项与常见问题</h2><ol><li><strong>App 闪退或无法连接</strong>：<ul><li>通常是因为网络不稳定或节点非美国地区。尝试切换节点并重启 App。</li></ul></li><li><strong>账号被封禁 (Account Banned)</strong>：<ul><li>如果打开 App 提示账号被禁用，或者号码突然消失，通常是因为 IP 变动过于剧烈（比如上一秒在洛杉矶，下一秒在纽约）或被系统判定为滥用。建议注册后尽量固定在一个 IP 地区使用。</li></ul></li><li><strong>关于广告</strong>：<ul><li>免费版底部会有广告条，这是正常的，不影响功能使用。</li></ul></li></ol><hr><blockquote><p><strong>最后总结</strong>：Talkatone 虽然好用，但门槛全在于 IP。拥有一个稳定、纯净的 IP 是稳定使用该服务的基础。</p><p>📧 <strong>如有 IP 使用问题，请邮件联系：<a href="mailto:vps@lin8177.top">vps@lin8177.top</a></strong></p></blockquote>]]></content>


    <summary type="html">&lt;h1 id=&quot;Talkatone-注册与使用全攻略（保姆级教程）&quot;&gt;&lt;a href=&quot;#Talkatone-注册与使用全攻略（保姆级教程）&quot; class=&quot;headerlink&quot; title=&quot;Talkatone 注册与使用全攻略（保姆级教程）&quot;&gt;&lt;/a&gt;Talkatone 注</summary>


    <category term="教程" scheme="https://nmsl-blog.pages.dev/categories/%E6%95%99%E7%A8%8B/"/>
    
    
  </entry>
  
  <entry>
    <title>学术写作新范式：Markdown 与 Pandoc 的完美结合</title>
    <link href="https://nmsl-blog.pages.dev/posts/3880688836/"/>
    <id>https://nmsl-blog.pages.dev/posts/3880688836/</id>
    <published>2026-01-23T14:46:05.857Z</published>
    <updated>2026-01-23T14:48:33.040Z</updated>
    
    <content type="html"><![CDATA[<p>在学术写作中，在这个“内容为王”但“格式折磨人”的领域，许多研究者将大量时间浪费在了调整 Word 文档的缩进、字体和参考文献格式上。本文将介绍一种高效的“纯文本”工作流：使用<strong>严格 Markdown</strong> 编写内容，并利用 <strong>Pandoc</strong> 进行专业的格式化输出。</p><h1 id="为什么要选择-Markdown-Pandoc？"><a href="#为什么要选择-Markdown-Pandoc？" class="headerlink" title="为什么要选择 Markdown + Pandoc？"></a>为什么要选择 Markdown + Pandoc？</h1><ul><li><strong>虽然无格式，胜似有格式</strong>：Markdown 让你专注于文字本身，通过语义标记（这是标题、那是列表）而非视觉标记（字号大一点、加粗）来写作。</li><li><strong>Pandoc 的魔力</strong>：被称为文档转换界的“瑞士军刀”，它可以将你的 Markdown 文本完美转换为符合期刊要求的 PDF、Word (docx) 甚至 HTML 幻灯片。</li><li><strong>版本控制</strong>：纯文本文件极小且易于使用 Git 进行版本管理。</li></ul><h1 id="严格-Markdown-语法指南"><a href="#严格-Markdown-语法指南" class="headerlink" title="严格 Markdown 语法指南"></a>严格 Markdown 语法指南</h1><p>为了确保文档的可移植性和 Pandoc 的正确解析，遵循严格的 Markdown 语法至关重要。这意味着要摒弃某些编辑器特有的“方言”，回归标准。</p><h2 id="1-标题-Headers"><a href="#1-标题-Headers" class="headerlink" title="1. 标题 (Headers)"></a>1. 标题 (Headers)</h2><p>使用 <code>#</code> 符号标记标题层级。<strong>注意</strong>：<code>#</code> 后必须加一个空格。</p><pre><code># 一级标题 (通常作为论文题目)# 二级标题 (章节)## 三级标题 (子章节)</code></pre><h2 id="2-段落与换行-Paragraphs"><a href="#2-段落与换行-Paragraphs" class="headerlink" title="2. 段落与换行 (Paragraphs)"></a>2. 段落与换行 (Paragraphs)</h2><p>在 Markdown 中，段落之间必须使用<strong>一个空行</strong>隔开。仅按一次回车通常会被视为空格（软换行），这在 LaTeX 渲染中尤为重要。</p><pre><code>这是第一段内容。这是第二段内容。中间必须有空行。</code></pre><h2 id="3-列表-Lists"><a href="#3-列表-Lists" class="headerlink" title="3. 列表 (Lists)"></a>3. 列表 (Lists)</h2><p>无序列表使用 <code>-</code>、<code>+</code> 或 <code>*</code>，有序列表使用数字加点。<strong>注意</strong>：符号后同样需要空格。</p><pre><code>- 方法 A- 方法 B  - 子方法 B.1 (缩进 2 或 4 个空格)1. 第一步2. 第二步</code></pre><h2 id="4-代码块与引用-Code-Blockquotes"><a href="#4-代码块与引用-Code-Blockquotes" class="headerlink" title="4. 代码块与引用 (Code &amp; Blockquotes)"></a>4. 代码块与引用 (Code &amp; Blockquotes)</h2><p>插入代码或算法伪代码时，使用三个反引号。引用文献内容使用 <code>&gt;</code>。</p><pre><code>&gt; 这是一个引用块。```pythondef hello():    print("world")</code></pre><h2 id="5-强调-Emphasis"><a href="#5-强调-Emphasis" class="headerlink" title="5. 强调 (Emphasis)"></a>5. 强调 (Emphasis)</h2><p>使用双星号表示<strong>加粗</strong>（语义上的 Strong），单星号表示<em>斜体</em>（语义上的 Emphasis）。请避免使用下划线，因为在处理数学公式时可能会引起歧义。</p><h1 id="面向学术的-Pandoc-扩展"><a href="#面向学术的-Pandoc-扩展" class="headerlink" title="面向学术的 Pandoc 扩展"></a>面向学术的 Pandoc 扩展</h1><p>标准 Markdown 难以满足论文需求，但 Pandoc 提供了关键的扩展语法。</p><h2 id="1-YAML-元数据块-Metadata"><a href="#1-YAML-元数据块-Metadata" class="headerlink" title="1. YAML 元数据块 (Metadata)"></a>1. YAML 元数据块 (Metadata)</h2><p>在文档的最开头，使用三条短横线包裹文档的元信息。Pandoc 会读取这些信息生成封面或页眉。</p><pre><code>---title: 论 Markdown 在学术写作中的应用author: 张三date: 2024-01-24bibliography: references.bib---</code></pre><h2 id="2-数学公式-Math"><a href="#2-数学公式-Math" class="headerlink" title="2. 数学公式 (Math)"></a>2. 数学公式 (Math)</h2><p>Pandoc 支持标准的 LaTeX 语法插入公式。</p><ul><li>行内公式：使用单个美元符号 <code>$E=mc^2$</code>。</li><li>独立公式：使用两个美元符号。</li></ul><!-- --><pre><code>$$\int_{-\infty}^{\infty} e^{-x^2} dx = \sqrt{\pi}$$</code></pre><h2 id="3-脚注-Footnotes"><a href="#3-脚注-Footnotes" class="headerlink" title="3. 脚注 (Footnotes)"></a>3. 脚注 (Footnotes)</h2><p>使用 <code>[^标识符]</code> 的格式。</p><pre><code>这在这个研究中得到了证实[^1]。[^1]: 参见 Smith (2020) 的实验结果。</code></pre><h2 id="4-参考文献-Citations"><a href="#4-参考文献-Citations" class="headerlink" title="4. 参考文献 (Citations)"></a>4. 参考文献 (Citations)</h2><p>配合 <code>.bib</code> 文件，你可以使用 <code>@</code> 符号引用。</p><pre><code>根据 @smith2023 的研究...这一结论已被多方证实 [@doe2022; @lee2021]。</code></pre><h1 id="使用-Pandoc-快速格式化"><a href="#使用-Pandoc-快速格式化" class="headerlink" title="使用 Pandoc 快速格式化"></a>使用 Pandoc 快速格式化</h1><p>编写完成后，使用命令行调用 Pandoc 进行转换。</p><h2 id="转换为-Word-docx"><a href="#转换为-Word-docx" class="headerlink" title="转换为 Word (docx)"></a>转换为 Word (docx)</h2><p>这是最通用的格式，适合发送给导师修改。</p><pre><code>pandoc paper.md -o paper.docx --reference-doc=custom-reference.docx</code></pre><p><em>技巧：你可以制作一个设置好字体、页边距的 <code>custom-reference.docx</code> 作为模板。</em></p><h2 id="转换为-PDF"><a href="#转换为-PDF" class="headerlink" title="转换为 PDF"></a>转换为 PDF</h2><p>生成专业的排版（通常需要安装 LaTeX 环境，如 TeX Live）。</p><pre><code>pandoc paper.md -o paper.pdf --pdf-engine=xelatex -V mainfont="SimSun"</code></pre><ul><li><code>--pdf-engine=xelatex</code>：推荐用于处理中文字符。</li><li><code>-V mainfont="SimSun"</code>：指定中文字体（如宋体），防止乱码。</li><li><code>--bibliography=refs.bib</code>：处理参考文献。</li><li><code>--csl=ieee.csl</code>：指定引用格式（如 IEEE, APA 等）。</li></ul><h1 id="结语"><a href="#结语" class="headerlink" title="结语"></a>结语</h1><p>通过“严格 Markdown + Pandoc”的工作流，你将彻底告别“调整图片位置导致全文乱序”的噩梦。内容与格式的分离，正是高效写作的精髓所在。现在，打开你最喜欢的文本编辑器，开始专注的写作之旅吧。</p>]]></content>


    <summary type="html">&lt;p&gt;在学术写作中，在这个“内容为王”但“格式折磨人”的领域，许多研究者将大量时间浪费在了调整 Word 文档的缩进、字体和参考文献格式上。本文将介绍一种高效的“纯文本”工作流：使用&lt;strong&gt;严格 Markdown&lt;/strong&gt; 编写内容，并利用 &lt;strong&gt;Pan</summary>


    <category term="教程" scheme="https://nmsl-blog.pages.dev/categories/%E6%95%99%E7%A8%8B/"/>
    
    
  </entry>
  
  <entry>
    <title>Git的使用</title>
    <link href="https://nmsl-blog.pages.dev/posts/910554793/"/>
    <id>https://nmsl-blog.pages.dev/posts/910554793/</id>
    <published>2026-01-18T09:15:11.114Z</published>
    <updated>2026-01-18T09:15:14.110Z</updated>
    
    <content type="html"><![CDATA[<h1 id="初始化本地仓库"><a href="#初始化本地仓库" class="headerlink" title="初始化本地仓库"></a>初始化本地仓库</h1><p>首先，你需要进入你的项目文件夹，并将其初始化为一个 Git 仓库。</p><pre><code># 进入你的项目目录cd /path/to/your/project# 初始化仓库git init</code></pre><h1 id="设置用户名和邮箱"><a href="#设置用户名和邮箱" class="headerlink" title="设置用户名和邮箱"></a>设置用户名和邮箱</h1><pre><code>git config --global user.name "你的用户名"git config --global user.email "你的邮箱@example.com"</code></pre><h1 id="连接远程仓库"><a href="#连接远程仓库" class="headerlink" title="连接远程仓库"></a>连接远程仓库</h1><pre><code># 关联远程仓库 (将 &lt;URL&gt; 替换为你的仓库地址)git remote add origin https://github.com/用户名/仓库名.git# 验证关联情况git remote -v</code></pre><h1 id="完整提交流程"><a href="#完整提交流程" class="headerlink" title="完整提交流程"></a>完整提交流程</h1><pre><code># 添加文件到暂存区git add .# 提交到本地仓库git commit -m "首次提交：初始化项目"# 推送到远程仓库git branch -M maingit push -u origin main</code></pre>]]></content>


    <summary type="html">&lt;h1 id=&quot;初始化本地仓库&quot;&gt;&lt;a href=&quot;#初始化本地仓库&quot; class=&quot;headerlink&quot; title=&quot;初始化本地仓库&quot;&gt;&lt;/a&gt;初始化本地仓库&lt;/h1&gt;&lt;p&gt;首先，你需要进入你的项目文件夹，并将其初始化为一个 Git 仓库。&lt;/p&gt;
&lt;pre&gt;&lt;code&gt;#</summary>


    <category term="教程" scheme="https://nmsl-blog.pages.dev/categories/%E6%95%99%E7%A8%8B/"/>
    
    
  </entry>
  
  <entry>
    <title>什么叫你把Bitwarden部署到了Workers上</title>
    <link href="https://nmsl-blog.pages.dev/posts/3790755513/"/>
    <id>https://nmsl-blog.pages.dev/posts/3790755513/</id>
    <published>2026-01-15T15:26:15.485Z</published>
    <updated>2026-01-15T15:26:17.136Z</updated>
    
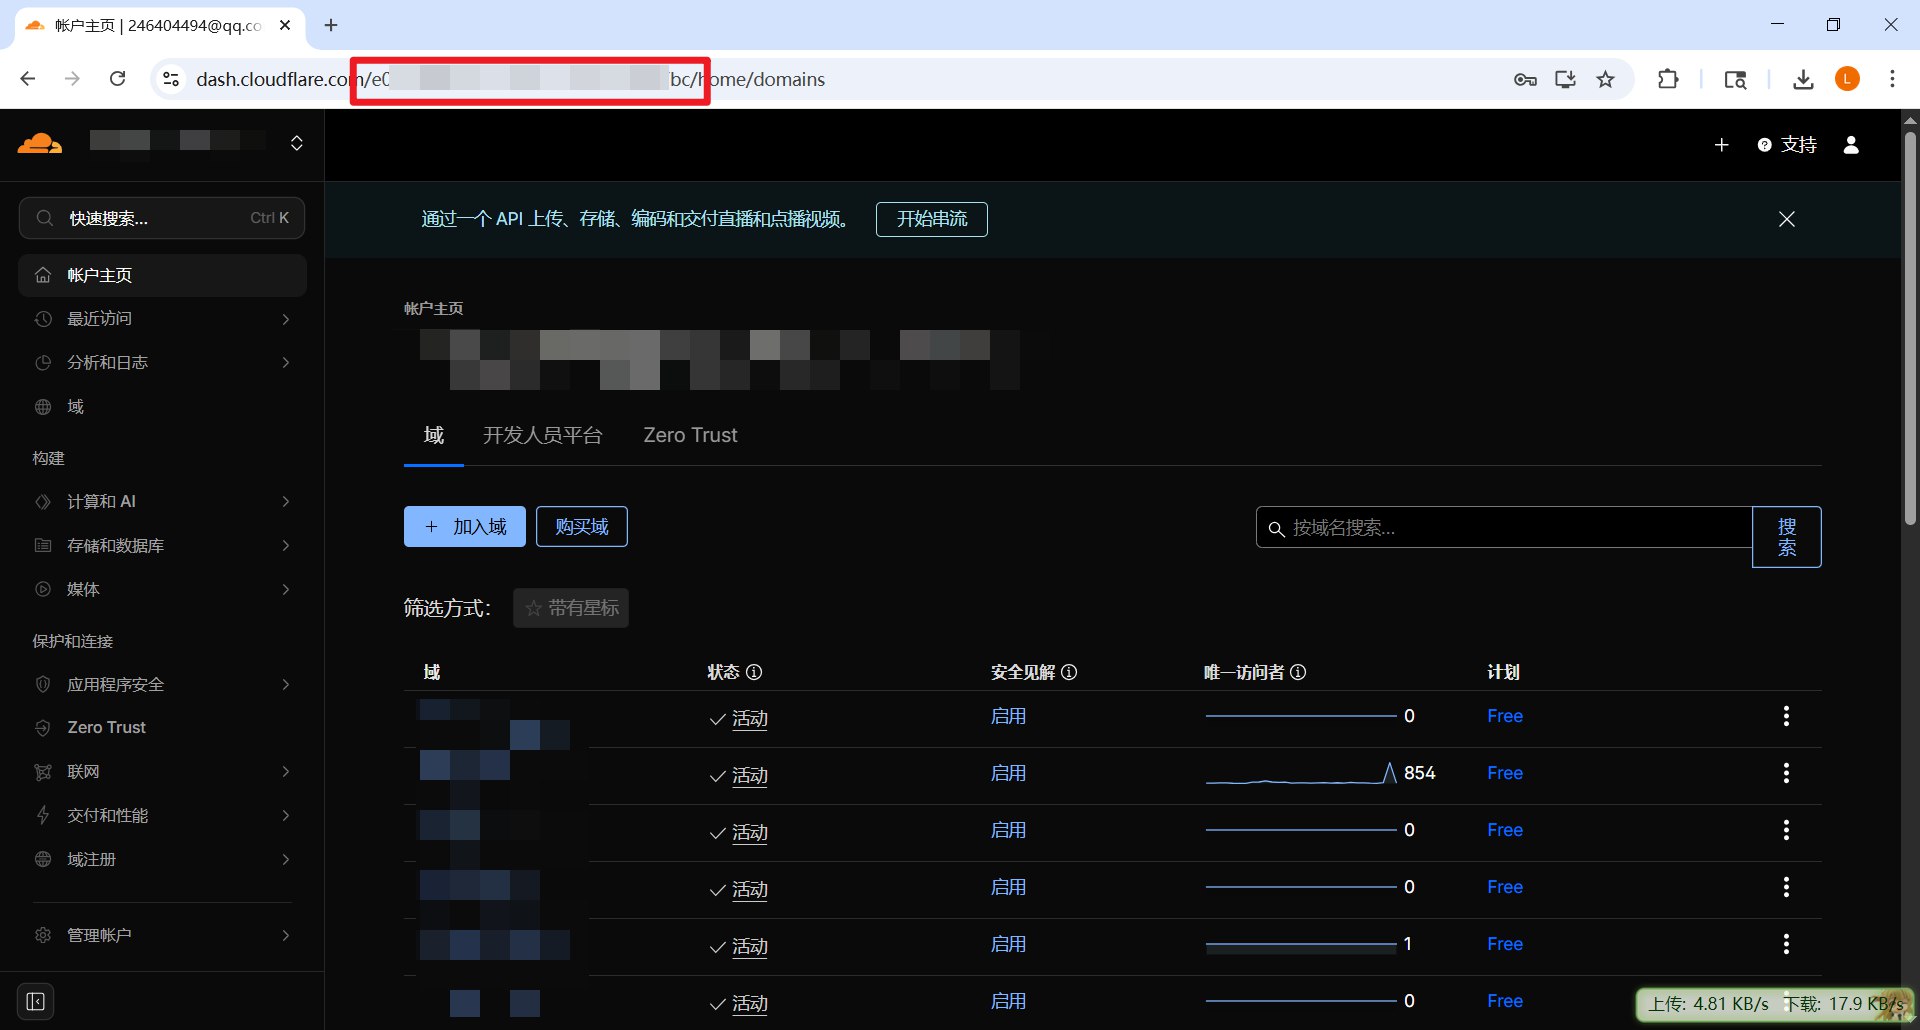
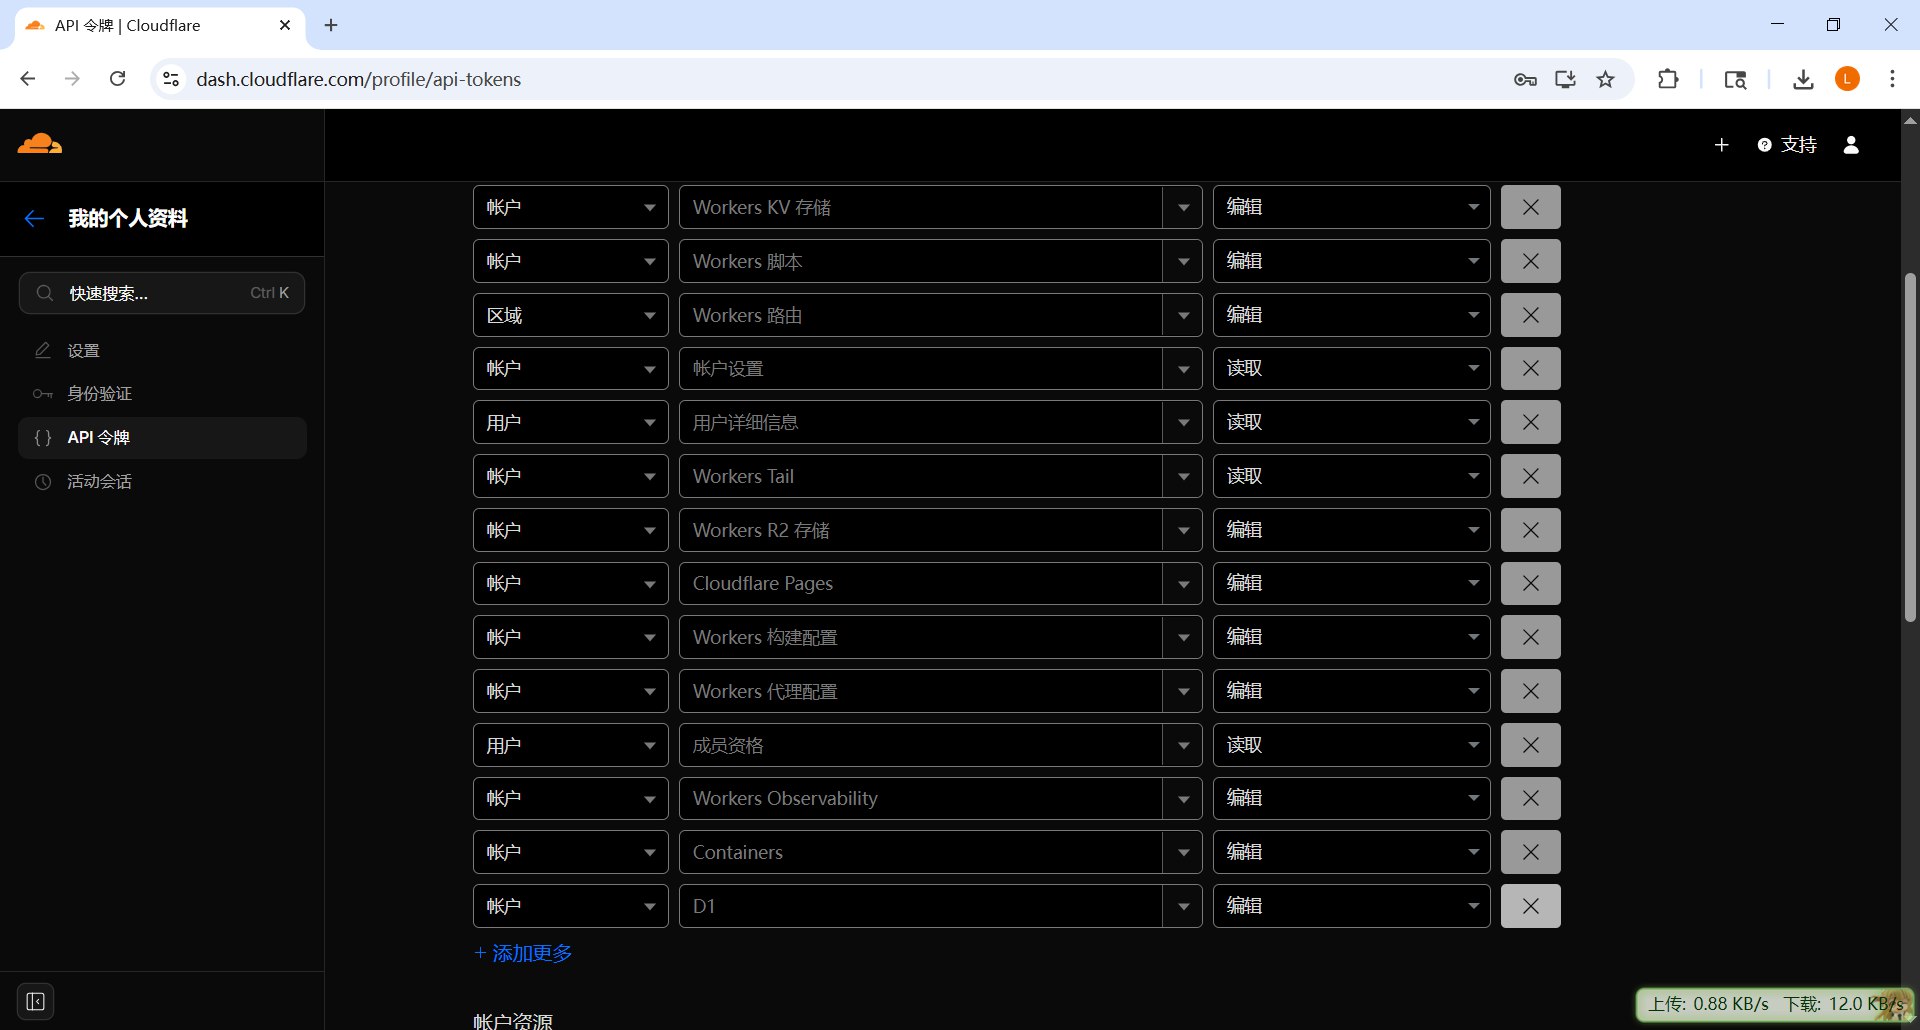
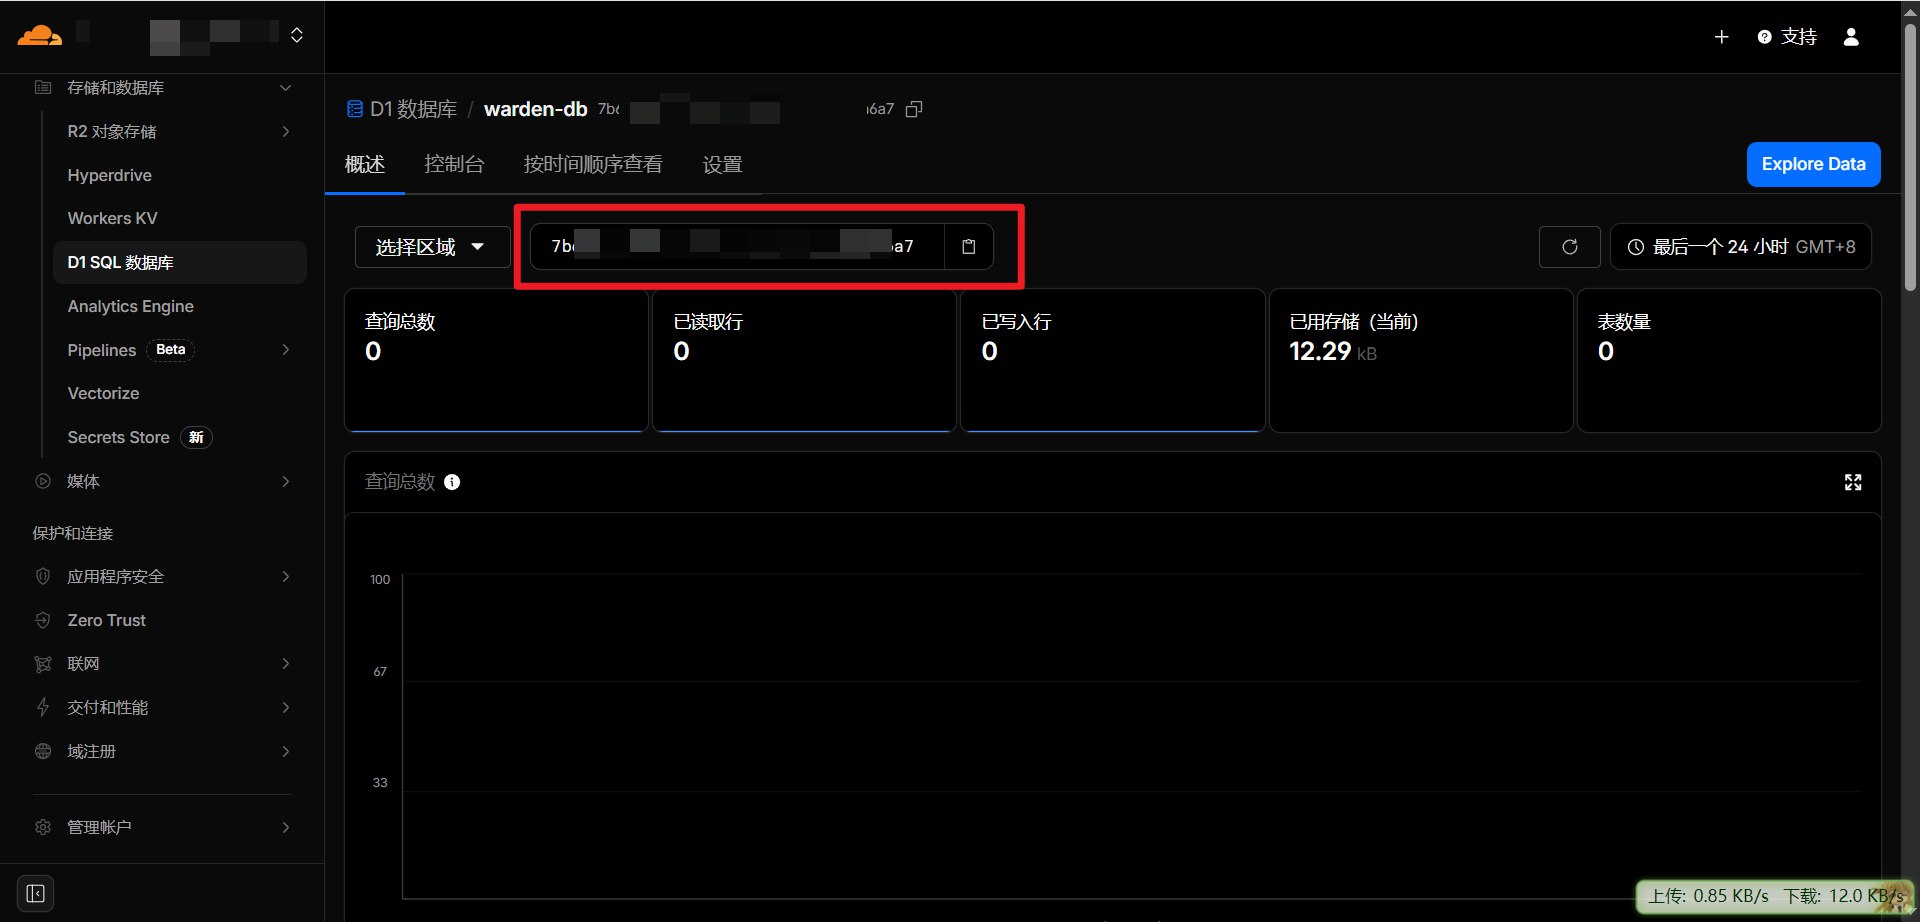
    <content type="html"><![CDATA[<h1 id="配置Github"><a href="#配置Github" class="headerlink" title="配置Github"></a>配置Github</h1><p>打开<a href="https://github.com/qaz741wsd856/warden-worker">项目的Github</a>，Fork项目。</p><p>点击 settings - Secrets and variables - Actions，准备添加 Repository secrets，接下来我们一共要添加三个secrets。</p><h2 id="配置Cloudflare-ID"><a href="#配置Cloudflare-ID" class="headerlink" title="配置Cloudflare ID"></a>配置Cloudflare ID</h2><p>打开<a href="https://dash.cloudflare.com/">Cloudflare</a>，在浏览器地址栏中复制你的account id<br><img src="https://img.lin8177.top/file/1768513369064_image.png" alt="image.png"><br>回到github页面，点击New repository secret，名称写CLOUDFLARE_ACCOUNT_ID，值就写刚才复制的id。</p><h2 id="配置Cloudflare-API"><a href="#配置Cloudflare-API" class="headerlink" title="配置Cloudflare API"></a>配置Cloudflare API</h2><p>打开<a href="https://dash.cloudflare.com/profile/api-tokens">Cloudflare API</a>，选择编辑Worker的模板，然后给它再添加D1的编辑权限，再创建api令牌，回到github页面添加为CLOUDFLARE_API_TOKEN。<br><img src="https://img.lin8177.top/file/1768513599855_image.png" alt="image.png"></p><h2 id="添加D1数据库"><a href="#添加D1数据库" class="headerlink" title="添加D1数据库"></a>添加D1数据库</h2><p>去Cloudflare中创建一个D1数据库，并复制他的id<br><img src="https://img.lin8177.top/file/1768513815230_image.png" alt="image.png"><br>回到github，添加为D1_DATABASE_ID。</p><p>至此在github上的配置就完毕了，点击上方的Actions选项卡，选到Build工作流点运行即可。</p><h1 id="建表"><a href="#建表" class="headerlink" title="建表"></a>建表</h1><p>打开刚才创建的数据库，点Explore Data，然后在Query窗口中分别粘贴并运行以下sql建表语句(定义在sql/schema.sql中)，一次只执行一条：</p><pre><code>CREATE TABLE IF NOT EXISTS users (    id TEXT PRIMARY KEY NOT NULL,    name TEXT,    avatar_color TEXT,    email TEXT NOT NULL UNIQUE,    email_verified BOOLEAN NOT NULL DEFAULT 0,    master_password_hash TEXT NOT NULL,    master_password_hint TEXT,    password_salt TEXT, -- Salt for server-side PBKDF2 hashing (NULL for legacy users pending migration)    key TEXT NOT NULL, -- The encrypted symmetric key    private_key TEXT NOT NULL, -- encrypted asymmetric private_key    public_key TEXT NOT NULL, -- asymmetric public_key    kdf_type INTEGER NOT NULL DEFAULT 0, -- 0 for PBKDF2, 1 for Argon2id    kdf_iterations INTEGER NOT NULL DEFAULT 600000,    kdf_memory INTEGER, -- Argon2 memory parameter in MB (15-1024), NULL for PBKDF2    kdf_parallelism INTEGER, -- Argon2 parallelism parameter (1-16), NULL for PBKDF2    security_stamp TEXT,    totp_recover TEXT, -- Recovery code for 2FA    created_at TEXT NOT NULL,    updated_at TEXT NOT NULL);CREATE TABLE IF NOT EXISTS ciphers (    id TEXT PRIMARY KEY NOT NULL,    user_id TEXT,    organization_id TEXT,    type INTEGER NOT NULL,    data TEXT NOT NULL, -- JSON blob of all encrypted fields (name, notes, login, etc.)    favorite BOOLEAN NOT NULL DEFAULT 0,    folder_id TEXT,    deleted_at TEXT,    created_at TEXT NOT NULL,    updated_at TEXT NOT NULL,    FOREIGN KEY (user_id) REFERENCES users(id) ON DELETE CASCADE,    FOREIGN KEY (folder_id) REFERENCES folders(id) ON DELETE SET NULL);CREATE TABLE IF NOT EXISTS folders (    id TEXT PRIMARY KEY NOT NULL,    user_id TEXT NOT NULL,    name TEXT NOT NULL, -- Encrypted folder name    created_at TEXT NOT NULL,    updated_at TEXT NOT NULL,    FOREIGN KEY (user_id) REFERENCES users(id) ON DELETE CASCADE);CREATE TABLE IF NOT EXISTS attachments (    id TEXT PRIMARY KEY NOT NULL,    cipher_id TEXT NOT NULL,    file_name TEXT NOT NULL,    file_size INTEGER NOT NULL,    akey TEXT,    created_at TEXT NOT NULL,    updated_at TEXT NOT NULL,    organization_id TEXT,    FOREIGN KEY (cipher_id) REFERENCES ciphers(id) ON DELETE CASCADE);CREATE INDEX IF NOT EXISTS idx_attachments_cipher ON attachments(cipher_id);CREATE TABLE IF NOT EXISTS attachments_pending (    id TEXT PRIMARY KEY NOT NULL,    cipher_id TEXT NOT NULL,    file_name TEXT NOT NULL,    file_size INTEGER NOT NULL,    akey TEXT,    created_at TEXT NOT NULL,    updated_at TEXT NOT NULL,    organization_id TEXT,    FOREIGN KEY (cipher_id) REFERENCES ciphers(id) ON DELETE CASCADE);CREATE INDEX IF NOT EXISTS idx_attachments_pending_cipher ON attachments_pending(cipher_id);CREATE INDEX IF NOT EXISTS idx_attachments_pending_created_at ON attachments_pending(created_at);CREATE TABLE IF NOT EXISTS twofactor (    uuid TEXT PRIMARY KEY NOT NULL,    user_uuid TEXT NOT NULL,    atype INTEGER NOT NULL,    enabled INTEGER NOT NULL DEFAULT 1,    data TEXT NOT NULL, -- JSON data specific to the 2FA type (e.g., TOTP secret)    last_used INTEGER NOT NULL DEFAULT 0, -- Unix timestamp or TOTP time step    FOREIGN KEY (user_uuid) REFERENCES users(id) ON DELETE CASCADE,    UNIQUE(user_uuid, atype));</code></pre><h1 id="配置环境变量"><a href="#配置环境变量" class="headerlink" title="配置环境变量"></a>配置环境变量</h1><p>当github的Action执行完毕后，你就能在CF的Workers中找到刚才创建的 warden-worker了，进入这个Worker的设置页面，在变量和机密栏添加以下三个密钥：</p><table><thead><tr><th>名称</th><th>说明</th></tr></thead><tbody><tr><td>ALLOWED_EMAILS</td><td>允许注册的完整邮箱，用,分隔</td></tr><tr><td>JWT_SECRET</td><td>随机长字符串</td></tr><tr><td>JWT_REFRESH_SECRET</td><td>随机长字符串</td></tr></tbody></table><h2 id="可选环境变量"><a href="#可选环境变量" class="headerlink" title="可选环境变量"></a>可选环境变量</h2><ul><li><code>IMPORT_BATCH_SIZE</code>：用于控制导入密码库时，每次批操作的数据条数，默认为30，设为0代表一次批操作导入所有数据（不推荐）；如果你需要导入的库特别大，可以适当调大这个值。</li><li><code>TRASH_AUTO_DELETE_DAYS</code>：配置回收站中的项目多少天后会被清理，默认为30，设为0代表永不清理。</li><li><code>DISABLE_USER_REGISTRATION</code>：用于控制是否表明服务器不支持注册，默认为true，设为false可以让客户端显示注册按钮；该选项不影响实际注册功能。</li><li><code>AUTHENTICATOR_DISABLE_TIME_DRIFT</code>：控制是否允许TOTP的时间±1偏移，默认为true。</li><li><code>ATTACHMENT_MAX_BYTES</code>：单个附件的大小限制，单位字节，默认不限制，填104857600则代表100MB。</li><li><code>ATTACHMENT_TOTAL_LIMIT_KB</code>：单个用户的总附件大小限制，单位KB，默认不限制，填1048576代表1GB。</li><li><code>ATTACHMENT_TTL_SECS</code>：附件的上传下载链接的有效时间，默认五分钟。</li></ul><p>然后在域和路由中添加一个路由，区域选择你的域名，路由写你分给这个Worker的子域名 + /<em>（如bitwarden.example.com/</em>）。</p><p>最后别忘记去给这个子域名添加一条dns记录。<br>如果你想优选IP，那就不开小黄云，把它CNAME到一个优选过的域名。<br>要是不想优选，那就打开小黄云，目标随便填。</p>]]></content>


    <summary type="html">&lt;h1 id=&quot;配置Github&quot;&gt;&lt;a href=&quot;#配置Github&quot; class=&quot;headerlink&quot; title=&quot;配置Github&quot;&gt;&lt;/a&gt;配置Github&lt;/h1&gt;&lt;p&gt;打开&lt;a href=&quot;https://github.com/qaz741wsd856/war</summary>


    <category term="教程" scheme="https://nmsl-blog.pages.dev/categories/%E6%95%99%E7%A8%8B/"/>
    
    
    <category term="Cloudflare" scheme="https://nmsl-blog.pages.dev/tags/Cloudflare/"/>
    
  </entry>
  
  <entry>
    <title>关闭Edge浏览器后台运行</title>
    <link href="https://nmsl-blog.pages.dev/posts/1851309375/"/>
    <id>https://nmsl-blog.pages.dev/posts/1851309375/</id>
    <published>2026-01-11T11:20:20.372Z</published>
    <updated>2026-01-11T11:28:27.987Z</updated>
    
    <content type="html"><![CDATA[<p>在网上看到不少网友提问，明明关掉了Edge浏览器，结果任务浏览器里发现Edge进程依旧在后台运行且占用大量资源，究竟应该怎么彻底关闭？</p><p>我最近也遇到了这个问题，在网上搜了很多教程，发现并没有用，反复折腾+检索微软社区资料，总算解决了这个问题。</p><h1 id="调整Edge设置"><a href="#调整Edge设置" class="headerlink" title="调整Edge设置"></a>调整Edge设置</h1><p>**以管理员身份运行Edge，**找到系统与性能选项卡，<strong>关闭“<a href="edge://settings/?search=%E5%90%AF%E5%8A%A8%E5%A2%9E%E5%BC%BA">启动增强</a>”“<a href="edge://settings/?search=%E5%85%B3%E9%97%AD+Microsoft+Edge+%E5%90%8E%E7%BB%A7%E7%BB%AD%E8%BF%90%E8%A1%8C%E5%90%8E%E5%8F%B0%E6%89%A9%E5%B1%95%E5%92%8C%E5%BA%94%E7%94%A8">在 Microsoft Edge 关闭后继续运行后台扩展和应用</a>”以及“<a href="edge://settings/?search=%E5%9C%A8%E5%8F%AF%E7%94%A8%E6%97%B6%E4%BD%BF%E7%94%A8%E5%9B%BE%E5%BD%A2%E5%8A%A0%E9%80%9F">在可用时使用图形加速</a>”。</strong>（复制蓝色字体的链接，浏览器新标签页打开即可跳转对应选项）</p><p>在之前的Edge版本中，关闭“启动增强”和“在 Microsoft Edge 关闭后继续运行后台扩展和应用”其实就OK了。但不知道从哪个版本起，不关闭“在可用时使用图形加速”依旧会导致后台驻留，不知道微软的三哥程序员怎么写的代码。</p><h1 id="关闭Windows-Copilot"><a href="#关闭Windows-Copilot" class="headerlink" title="关闭Windows Copilot"></a>关闭Windows Copilot</h1><p><strong>桌面端的Windows Copilot依赖于Edge，如果不关闭Windows Copilot，Edge依旧不会结束后台运行。</strong></p><p>对于装了高版本Win11的国内用户来说，虽然Copilot用不了，但不代表它不存在啊。</p><p><strong>新建一个文本文档， 复制如下内容</strong></p><pre><code>Windows Registry Editor Version 5.00【HKEY_CURRENT_USER\Software\Policies\Microsoft\Windows\WindowsCopilot】"TurnOffWindowsCopilot"=dword:00000001【HKEY_LOCAL_MACHINE\SOFTWARE\Policies\Microsoft\Windows\WindowsCopilot】"TurnOffWindowsCopilot"=dword:00000001</code></pre><p>保存后将后缀改为reg，运行后重启电脑就行了。</p>]]></content>


    <summary type="html">&lt;p&gt;在网上看到不少网友提问，明明关掉了Edge浏览器，结果任务浏览器里发现Edge进程依旧在后台运行且占用大量资源，究竟应该怎么彻底关闭？&lt;/p&gt;
&lt;p&gt;我最近也遇到了这个问题，在网上搜了很多教程，发现并没有用，反复折腾+检索微软社区资料，总算解决了这个问题。&lt;/p&gt;
&lt;h1 </summary>


    <category term="教程" scheme="https://nmsl-blog.pages.dev/categories/%E6%95%99%E7%A8%8B/"/>
    
    
    <category term="Edge" scheme="https://nmsl-blog.pages.dev/tags/Edge/"/>
    
  </entry>
  
  <entry>
    <title>使用优选域名加速Cloudflare Workers &amp; Pages</title>
    <link href="https://nmsl-blog.pages.dev/posts/4093848796/"/>
    <id>https://nmsl-blog.pages.dev/posts/4093848796/</id>
    <published>2026-01-10T01:00:07.174Z</published>
    <updated>2026-01-12T07:07:59.811Z</updated>
    
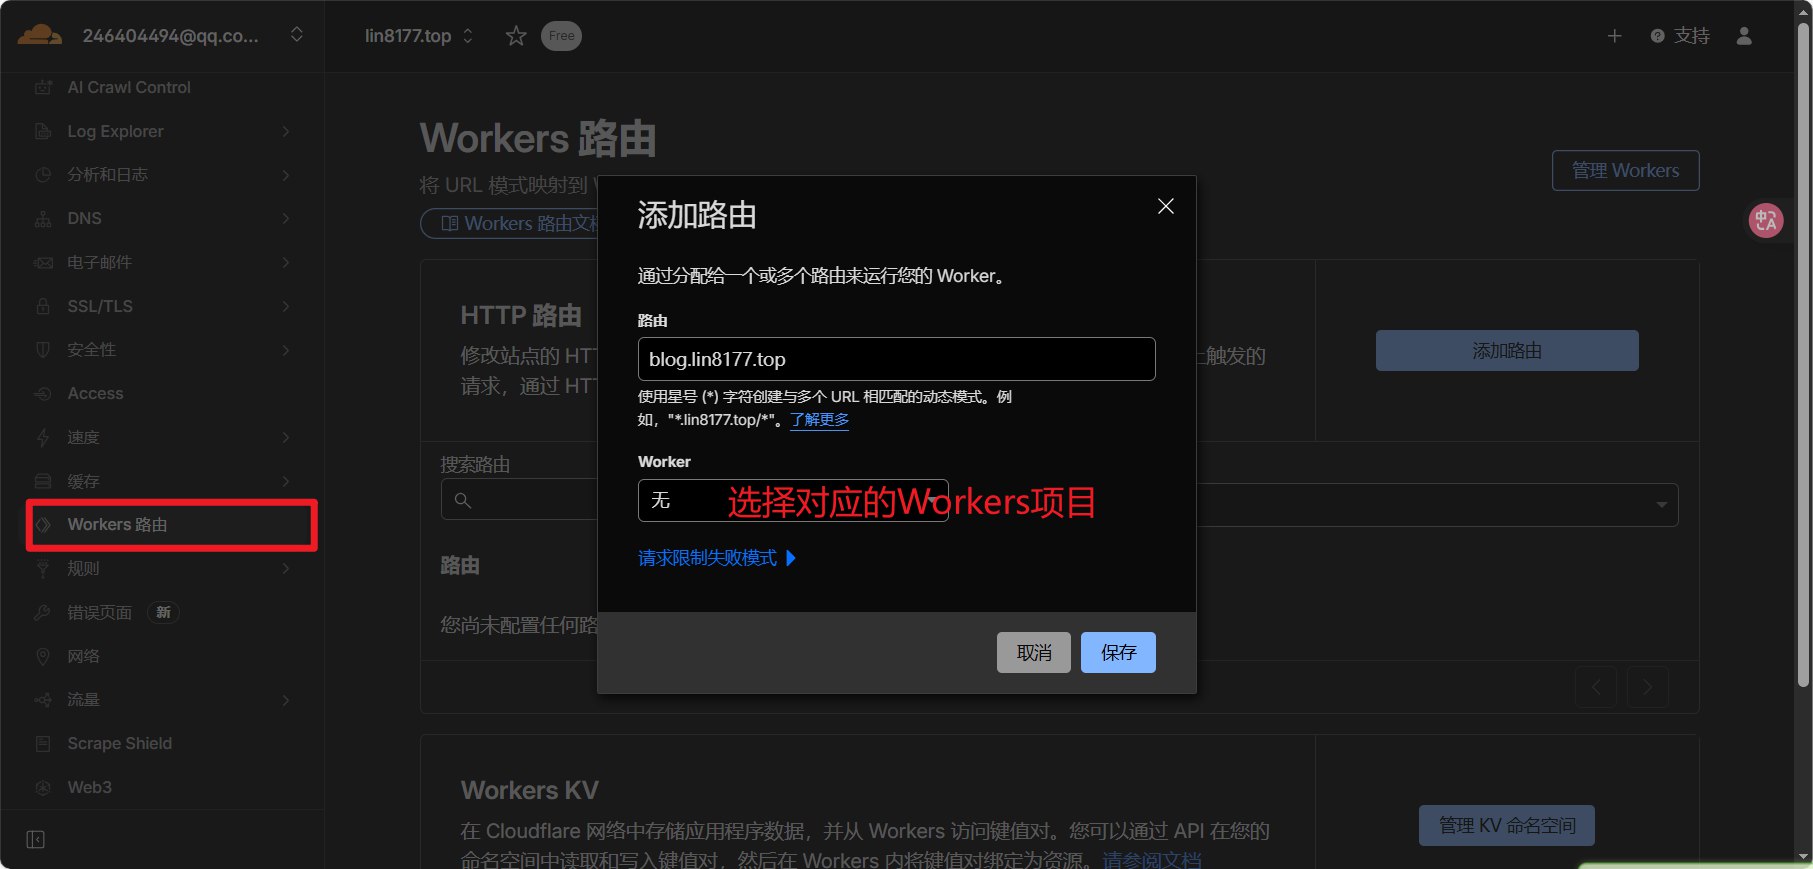
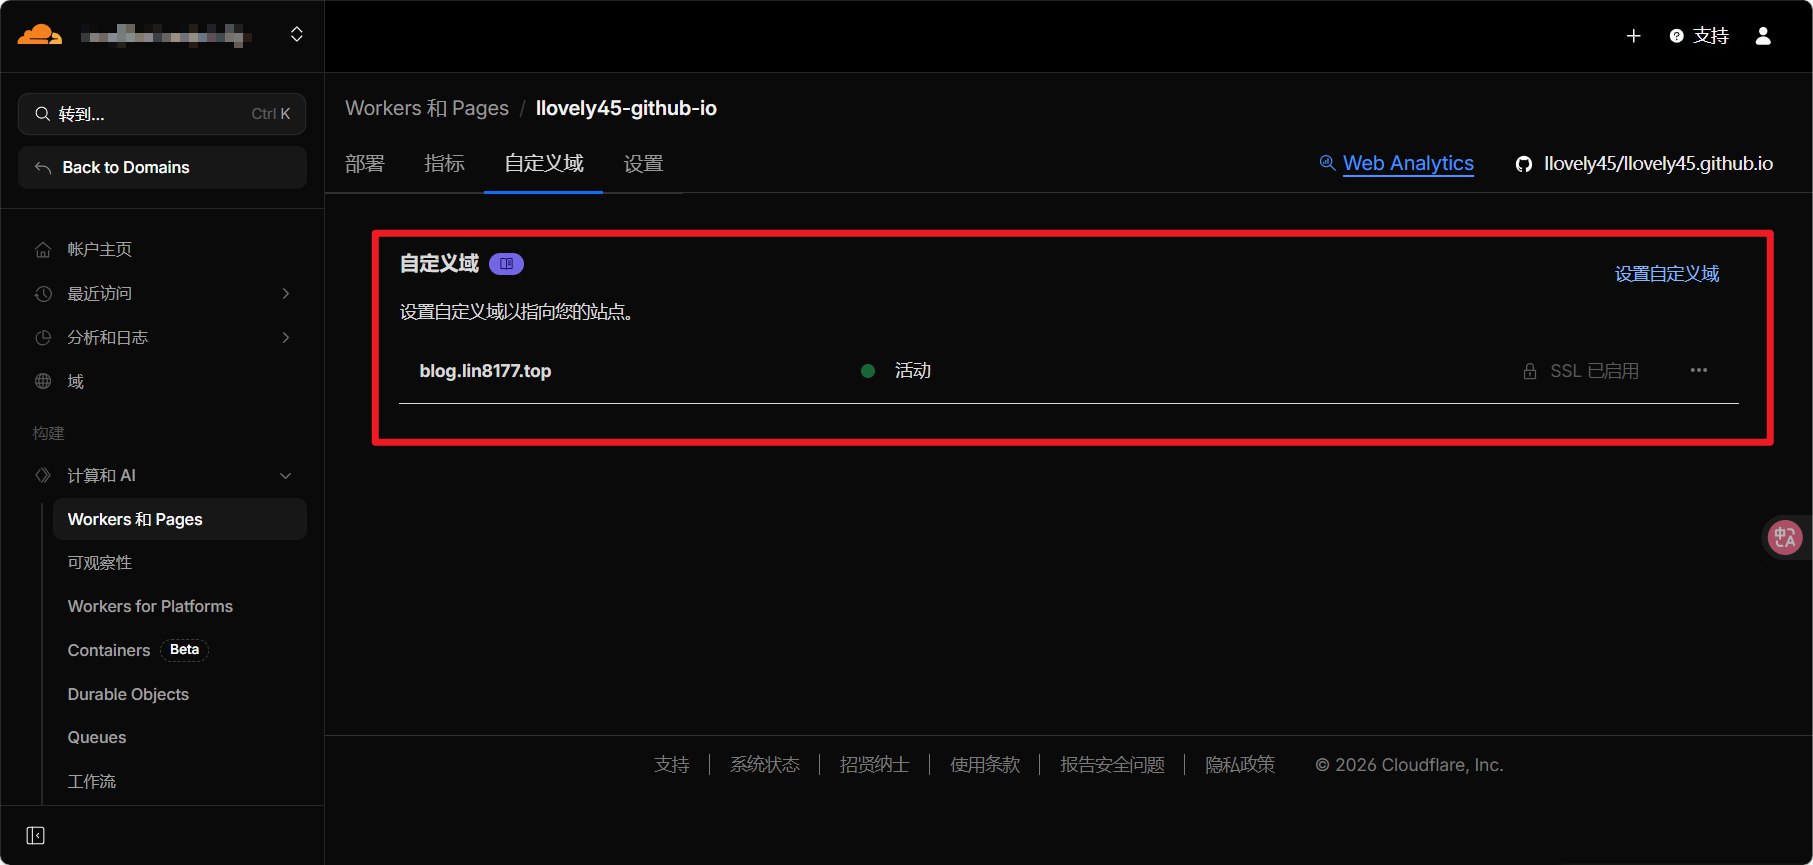
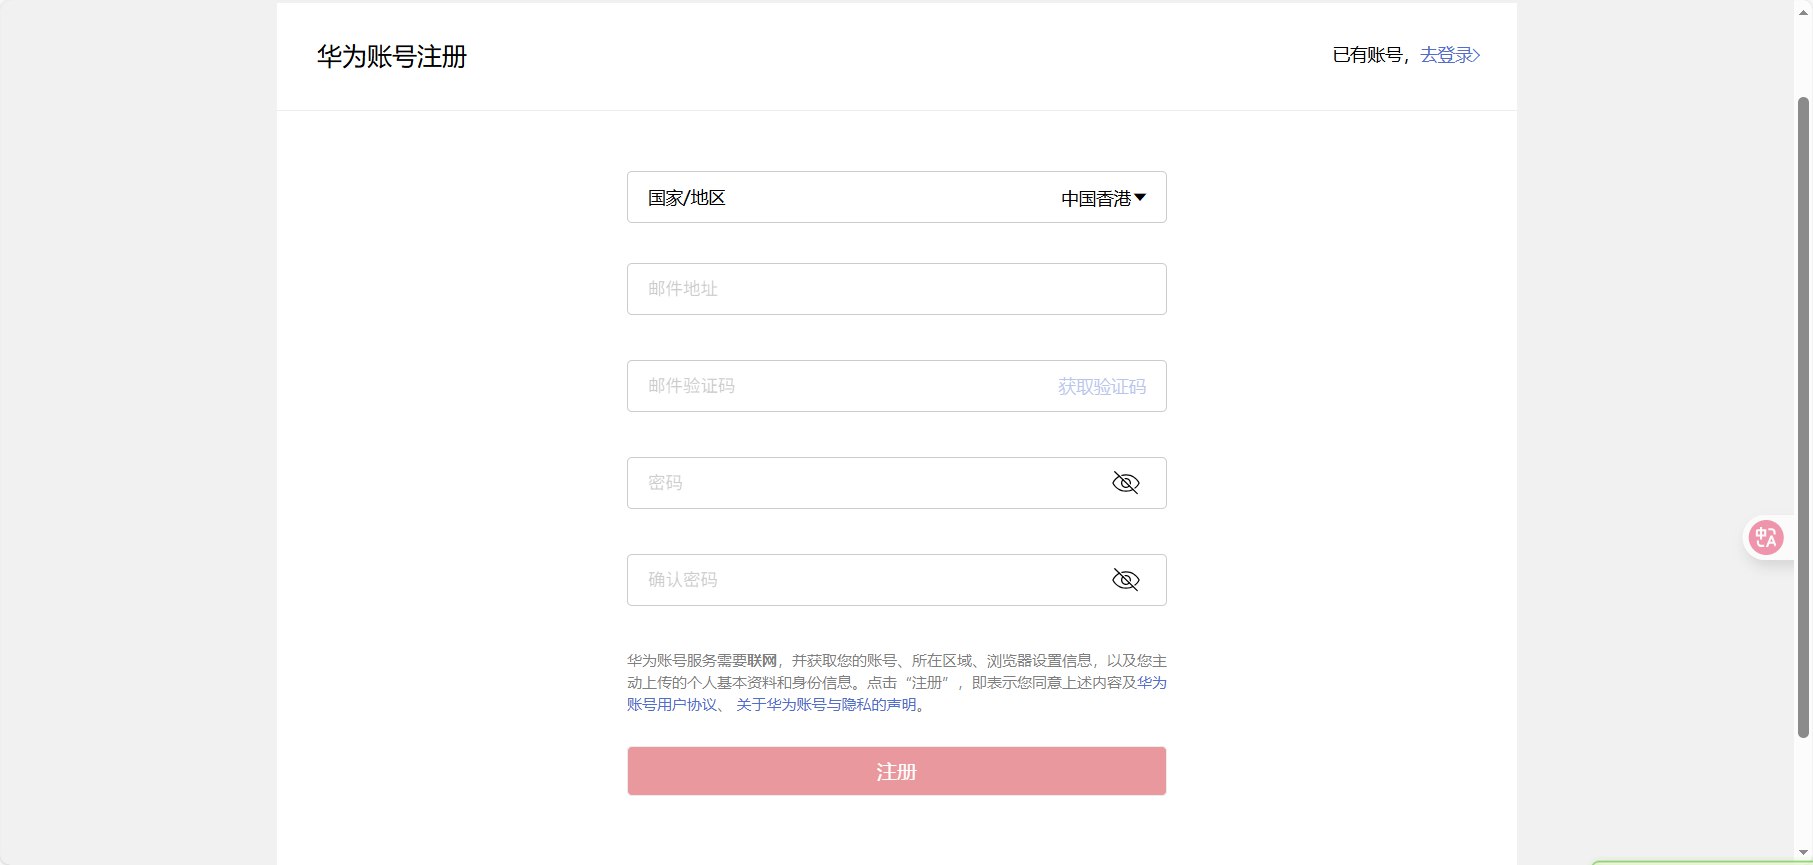
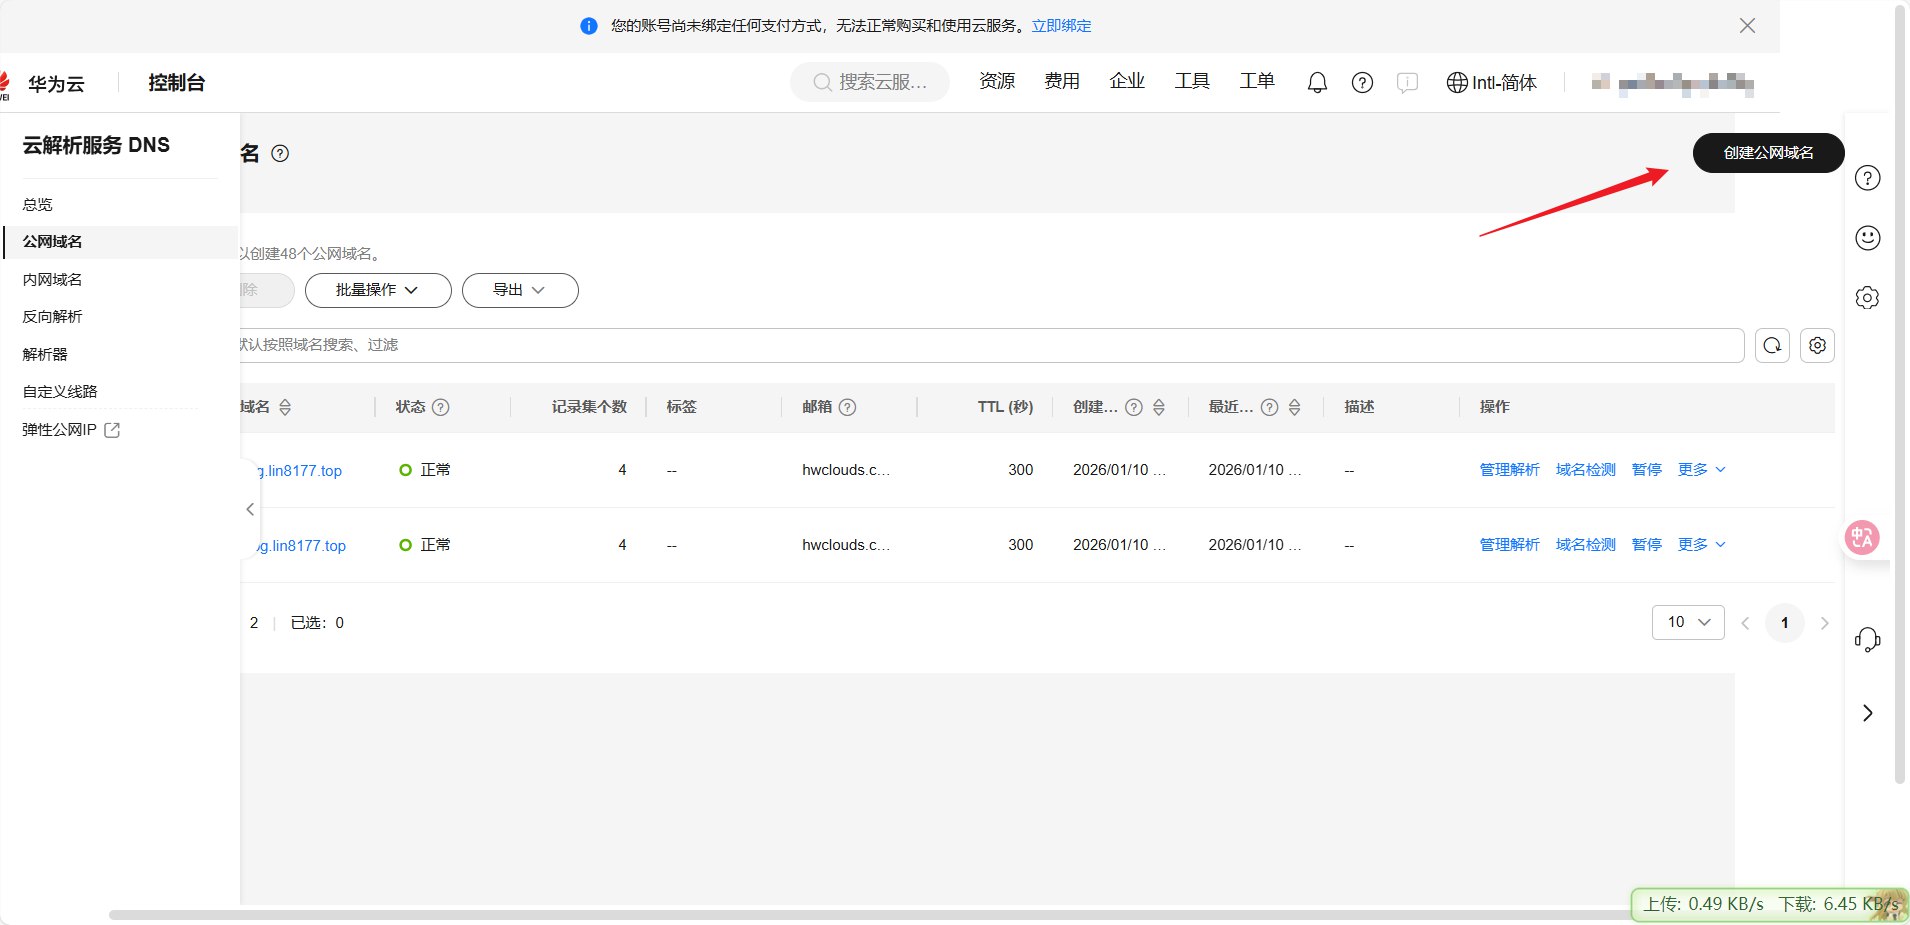
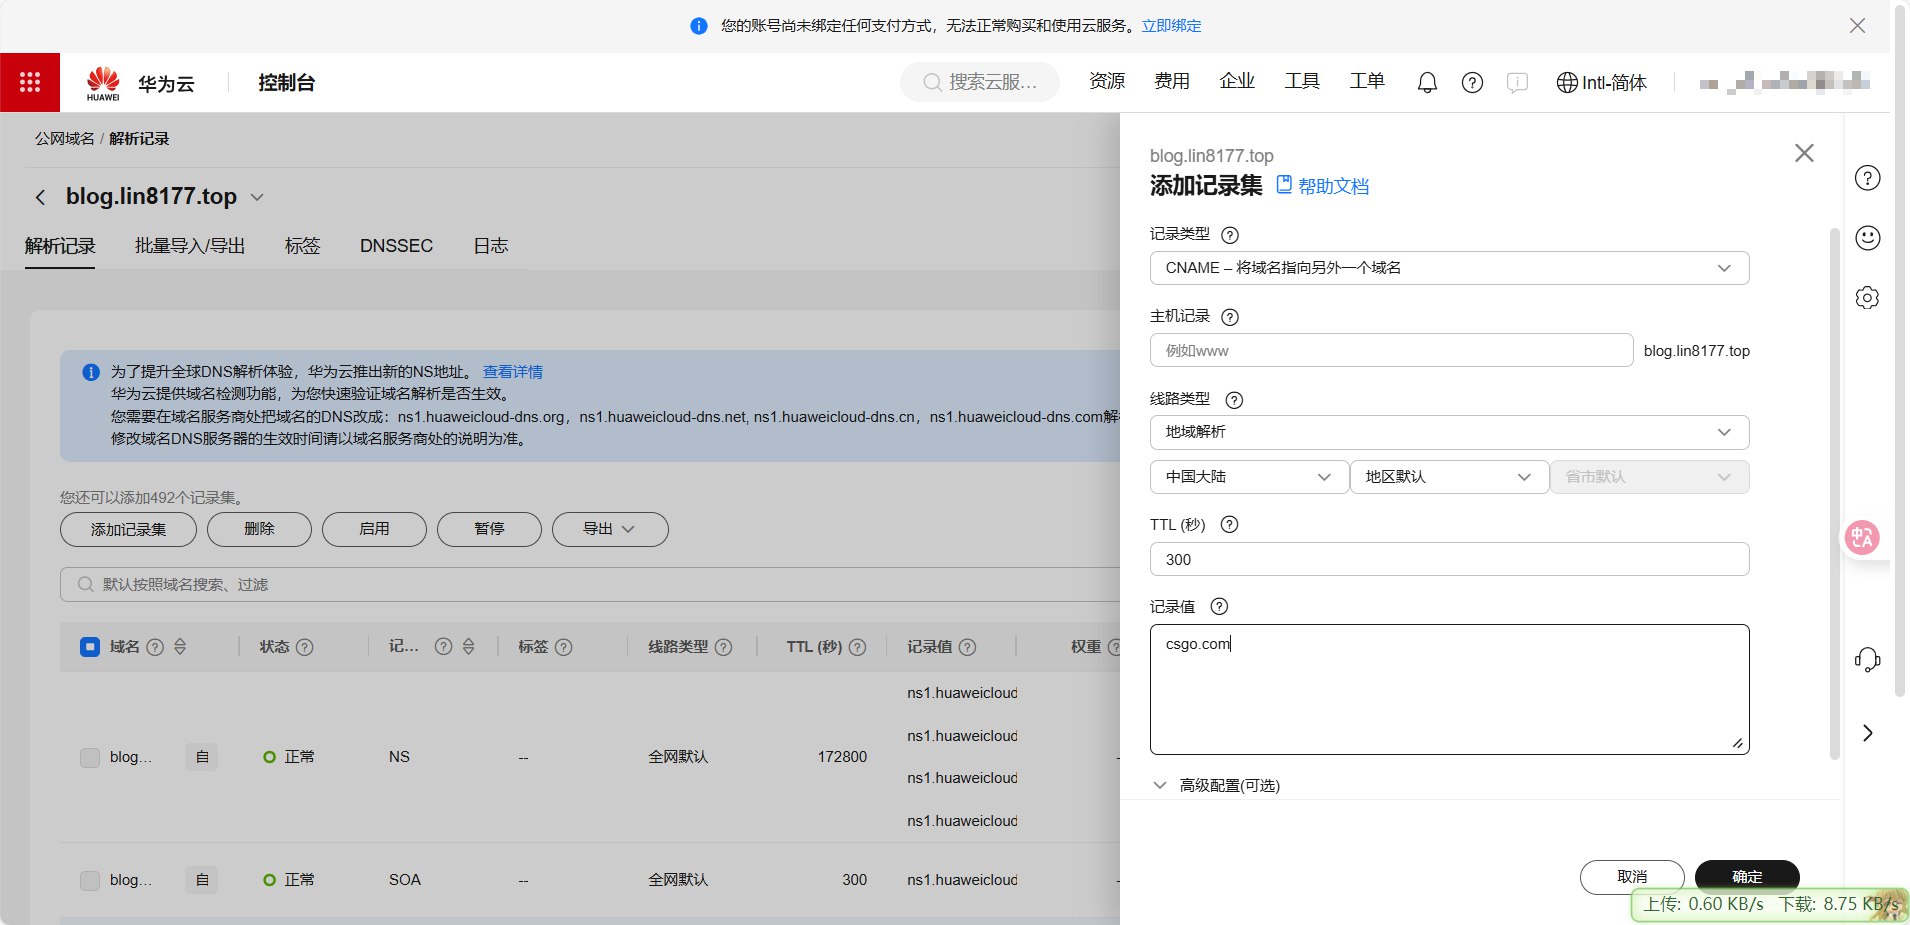
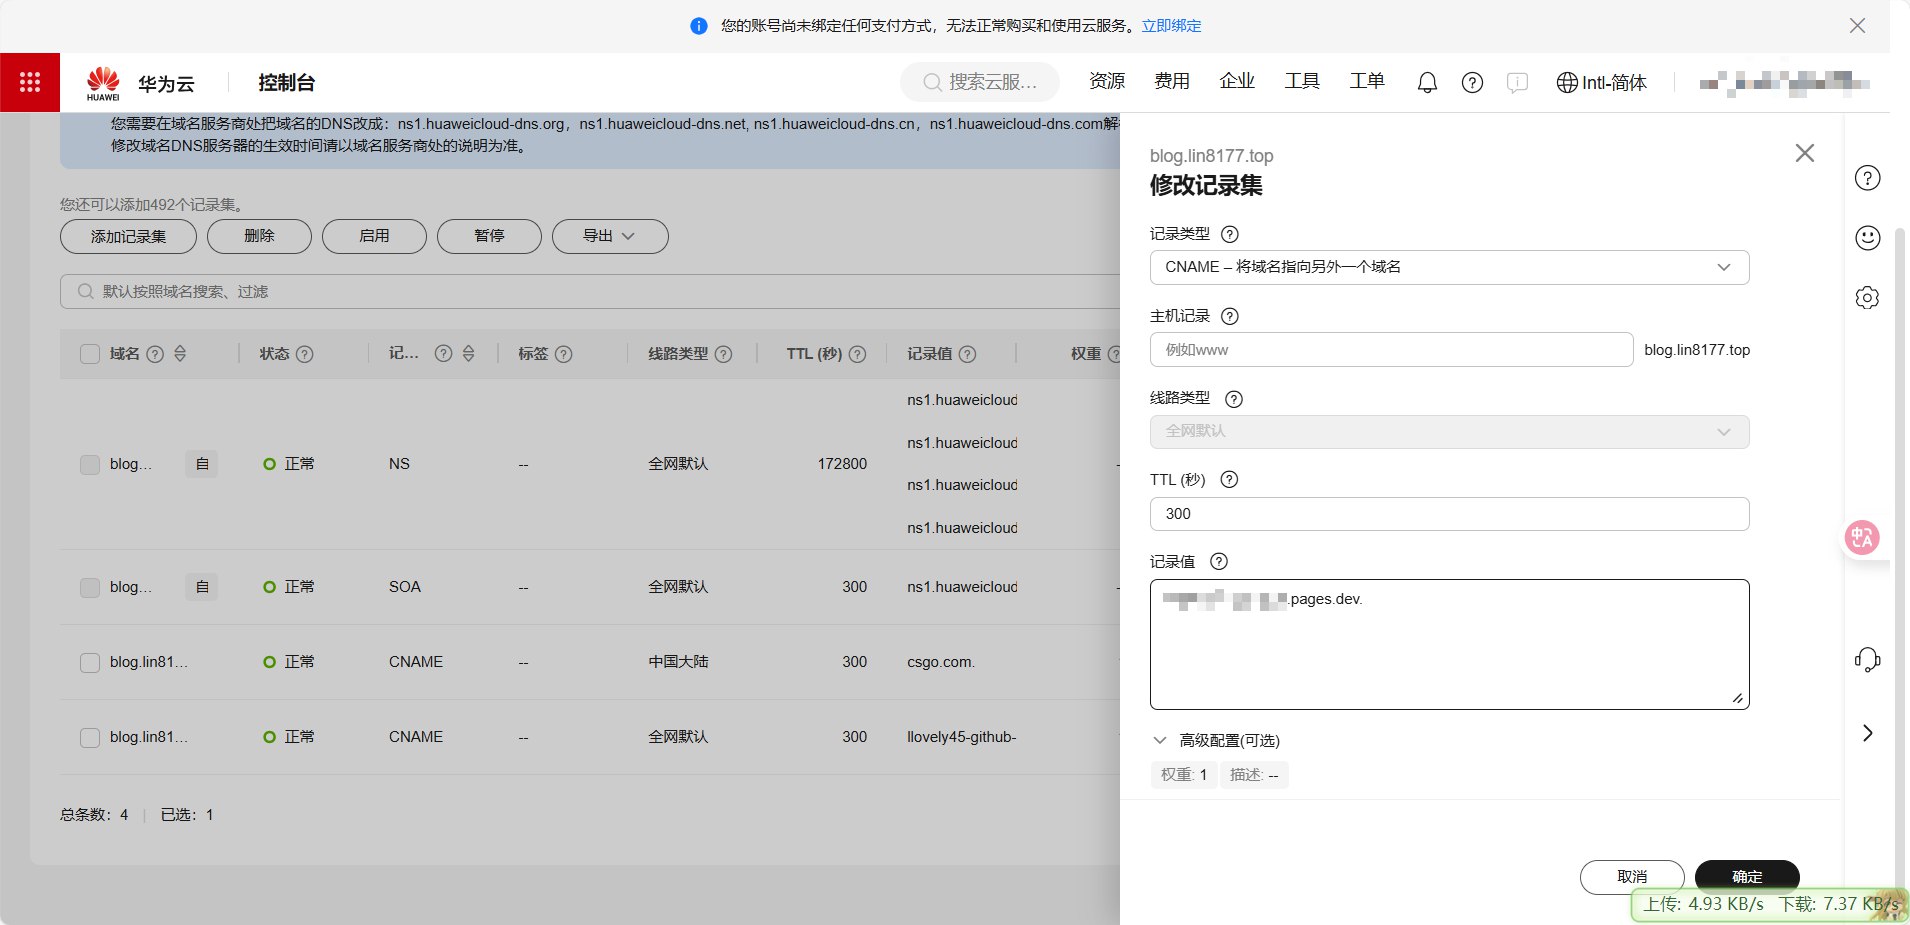
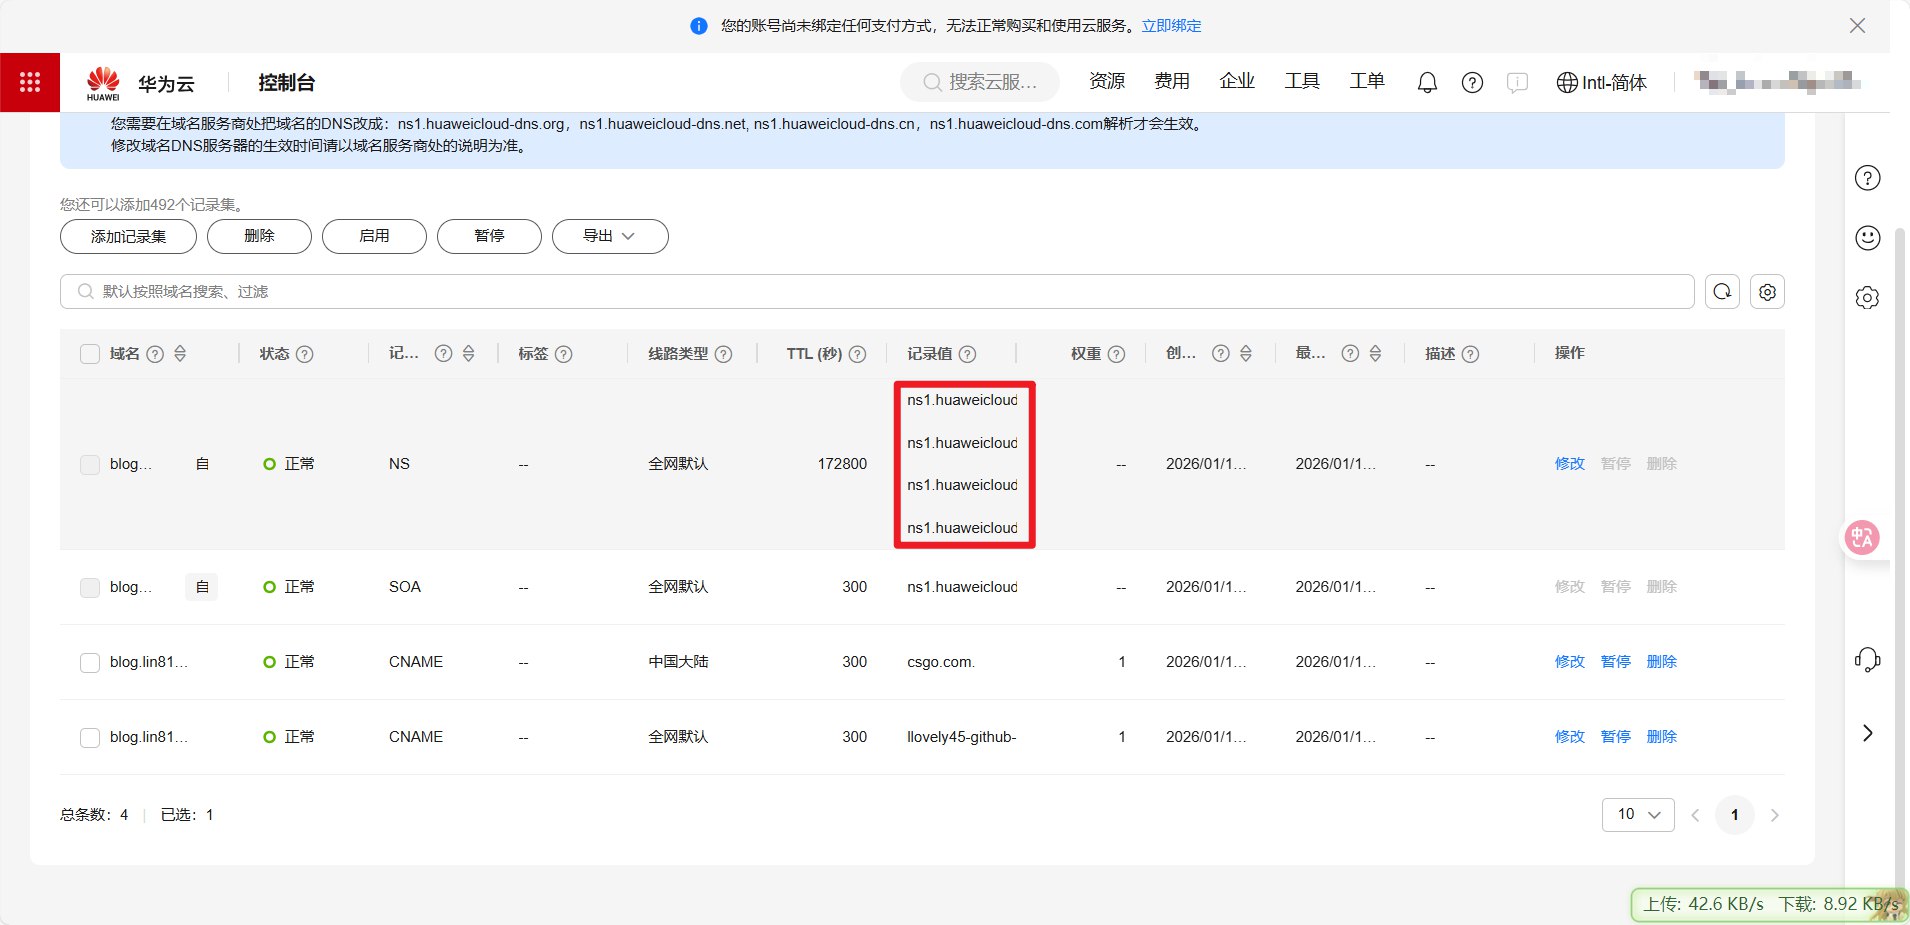
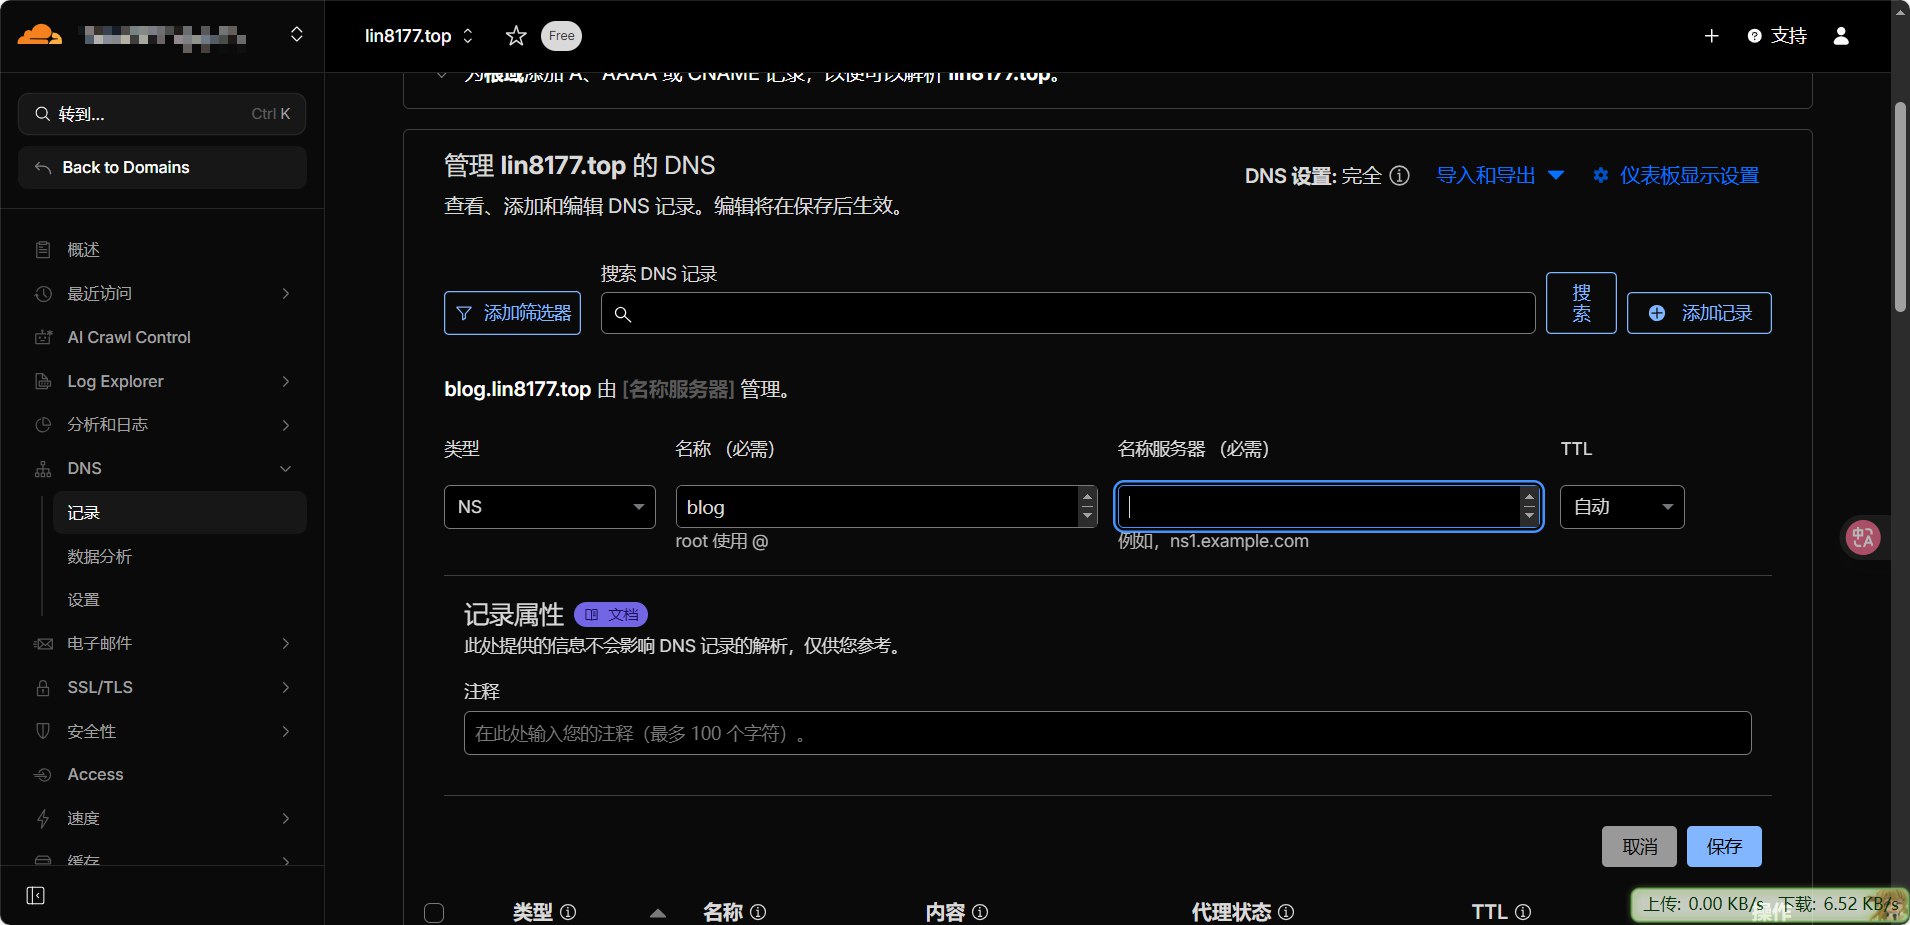
    <content type="html"><![CDATA[<h1 id="Workers-项目使用优选域名"><a href="#Workers-项目使用优选域名" class="headerlink" title="Workers 项目使用优选域名"></a>Workers 项目使用优选域名</h1><h2 id="设置自定义域-CNAME-记录至优选域名"><a href="#设置自定义域-CNAME-记录至优选域名" class="headerlink" title="设置自定义域 CNAME 记录至优选域名"></a>设置自定义域 <strong>CNAME 记录</strong>至<strong>优选域名</strong></h2><p>将需要优选的域名，例如<code>blog.lin8177.top</code>，添加一个<code>CNAME</code>解析到优选域名<code>csgo.com</code></p><p><strong>提示：不能开小黄云</strong></p><h2 id="设置-Workers-路由"><a href="#设置-Workers-路由" class="headerlink" title="设置 Workers 路由"></a>设置 Workers 路由</h2><p><img src="https://img.lin8177.top/file/1768036041894_image.png"></p><p>这样Workers就优选好了</p><p><strong>注意，域名后要加/</strong>*</p><h1 id="Pages-项目使用优选域名"><a href="#Pages-项目使用优选域名" class="headerlink" title="Pages 项目使用优选域名"></a>Pages 项目使用优选域名</h1><h2 id="添加自定义域"><a href="#添加自定义域" class="headerlink" title="添加自定义域"></a>添加自定义域</h2><p>在Pages项目中设置自定义域，以<code>blog.lin8177.top</code>为例，添加自定义域</p><p><img src="https://img.lin8177.top/file/1768036244755_image.png"></p><h2 id="注册华为云国际版"><a href="#注册华为云国际版" class="headerlink" title="注册华为云国际版"></a>注册华为云国际版</h2><p>注册<a href="https://console-intl.huaweicloud.com/dns/?region=af-north-1">华为云国际版</a></p><p><img src="https://img.lin8177.top/file/1768036395841_image.png"></p><p>仅需邮箱，KYC可跳过</p><h2 id="添加域名"><a href="#添加域名" class="headerlink" title="添加域名"></a>添加域名</h2><p><img src="https://img.lin8177.top/file/1768036535340_image.png"></p><p>直接填写需要优选的域名即可</p><h2 id="添加CNAME记录"><a href="#添加CNAME记录" class="headerlink" title="添加CNAME记录"></a>添加CNAME记录</h2><p>添加中国大陆的CNAME记录</p><p><img src="https://img.lin8177.top/file/1768036639107_image.png"></p><p>添加全球默认的CNAME记录，记录值为Pages项目分配的域名</p><p><img src="https://img.lin8177.top/file/1768036702162_image.png"></p><h1 id="添加NS记录"><a href="#添加NS记录" class="headerlink" title="添加NS记录"></a>添加NS记录</h1><p>记下华为云DNS中的NS记录的值<br><img src="https://img.lin8177.top/file/1768036760747_image.png"></p><p>进入Cloudflare中，添加四条NS记录</p><p><img src="https://img.lin8177.top/file/1768036844381_image.png"></p><p>至此，Pages项目就优选好了</p>]]></content>


    <summary type="html">&lt;h1 id=&quot;Workers-项目使用优选域名&quot;&gt;&lt;a href=&quot;#Workers-项目使用优选域名&quot; class=&quot;headerlink&quot; title=&quot;Workers 项目使用优选域名&quot;&gt;&lt;/a&gt;Workers 项目使用优选域名&lt;/h1&gt;&lt;h2 id=&quot;设置自定义域-CN</summary>


    <category term="教程" scheme="https://nmsl-blog.pages.dev/categories/%E6%95%99%E7%A8%8B/"/>
    
    
    <category term="Cloudflare" scheme="https://nmsl-blog.pages.dev/tags/Cloudflare/"/>
    
  </entry>
  
  <entry>
    <title>Hexo管理面板</title>
    <link href="https://nmsl-blog.pages.dev/posts/3199625328/"/>
    <id>https://nmsl-blog.pages.dev/posts/3199625328/</id>
    <published>2026-01-09T01:01:39.247Z</published>
    <updated>2026-01-09T01:48:40.936Z</updated>
    
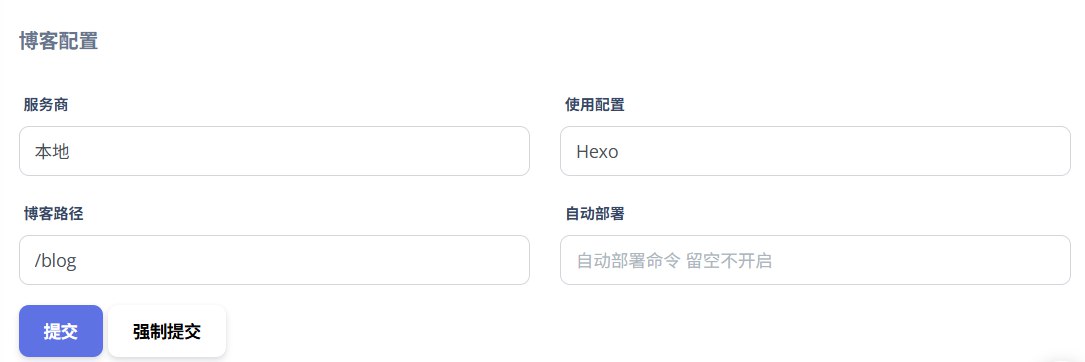
    <content type="html"><![CDATA[<p>个人不喜欢Qexo的Github Action方式，其本地方式又有问题，故在此给大家提供一种思路。</p><h1 id="安装Qexo"><a href="#安装Qexo" class="headerlink" title="安装Qexo"></a>安装Qexo</h1><p>自行阅读文档。<a href="https://oplog.cn/qexo/start.html">快速开始 | Qexo 文档</a>。以下提供本人自用的Docker run</p><pre><code>docker run -d \    --restart=unless-stopped \    -v $(pwd)/db:/app/db \    -v blog目录:/blog \    -p 127.0.0.1:40001:8000 \    -e TIMEOUT=600 \    --name="qexo" \    abudulin/qexo:latest</code></pre><p>其中blog目录设置为你的blog所在目录，端口映射如果你不在意直接暴露端口则可以不用设置监听<code>127.0.0.1</code>，当然我使用反代将<code>80</code>端口反代到<code>40001</code>端口，方便我套CDN，也避免泄露服务器的IP。</p><p>在Qexo设置方面，参考如下</p><p><img src="https://img.lin8177.top/file/1767950974483_image.png" alt="image.png"></p><h1 id="监听文件变动"><a href="#监听文件变动" class="headerlink" title="监听文件变动"></a>监听文件变动</h1><p>安装<code>inotify-tools</code></p><pre><code>sudo apt install inotify-tools</code></pre><p>找一个目录放监控脚本，我放在<code>/etc/komri/blog/blog_monitor.sh</code>，设置脚本有可执行权限<code>chmod -x /etc/komri/blog/blog_monitor.sh</code>，脚本美容如下</p><pre><code>#!/bin/bash# 监控的目标路径TARGET="/etc/komari/blog/source"# 检查目标是否存在if [ ! -d "$TARGET" ]; then    echo "错误: 目录 $TARGET 不存在。"    exit 1fiecho "开始监控 $TARGET ..."# 使用 inotifywait 监控# --format '%w%f' 输出完整路径inotifywait -m -r -e modify,create,delete,move --format '%w%f' "$TARGET" | while read FILEdo    # --- 防抖动逻辑 ---    # 发现变动后，等待 10 秒，如果期间还有变动，read -t 会继续读取    while read -t 10 NEXT_FILE; do        : # 丢弃短时间内的连续事件    done    echo "检测到变动：$FILE，正在执行任务..."      # 【在此处替换为你实际要执行的命令】    # 例如：/usr/bin/rsync -avz /etc/komari/blog/ /backup/blog/    cd /etc/komari/blog &amp;&amp; /usr/local/bin/hexo g &amp;&amp; /usr/local/bin/hexo d      echo "任务执行完毕，继续监控..."done</code></pre><h1 id="设置开机自启"><a href="#设置开机自启" class="headerlink" title="设置开机自启"></a>设置开机自启</h1><p>创建一个systemd服务，并编辑<code>vim /etc/systemd/system/blog-monitor.service</code></p><pre><code>[Unit]Description=Inotify Folder Monitor for Komari BlogAfter=network.target[Service]# 因为要监控 /etc 目录，通常需要 root 权限User=rootGroup=root# 执行脚本的路径ExecStart=/usr/local/bin/blog_monitor.sh# 崩溃自动重启设置# Restart=always 表示无论退出状态码是多少都会重启Restart=always# 重启前的等待时间RestartSec=5s# 限制日志输出大小（可选）StandardOutput=journalStandardError=journal[Install]# 设置开机自启WantedBy=multi-user.target</code></pre><p>重启systemd并设置开启自启</p><pre><code>sudo systemctl daemon-reloadsudo systemctl enable blog-monitor.servicesudo systemctl start blog-monitor.service</code></pre><p>这样就能监控是否创建了新的文章，如果修改了主题文件，则自己去<code>blog</code>文件夹下重新执行一遍<code>hexo clean &amp;&amp; hexo g &amp;&amp; hexo d</code></p>]]></content>


    <summary type="html">&lt;p&gt;个人不喜欢Qexo的Github Action方式，其本地方式又有问题，故在此给大家提供一种思路。&lt;/p&gt;
&lt;h1 id=&quot;安装Qexo&quot;&gt;&lt;a href=&quot;#安装Qexo&quot; class=&quot;headerlink&quot; title=&quot;安装Qexo&quot;&gt;&lt;/a&gt;安装Qexo&lt;/h1&gt;</summary>


    <category term="教程" scheme="https://nmsl-blog.pages.dev/categories/%E6%95%99%E7%A8%8B/"/>
    
    
    <category term="Hexo" scheme="https://nmsl-blog.pages.dev/tags/Hexo/"/>
    
  </entry>
  
  <entry>
    <title>谷歌反重力踩坑实录</title>
    <link href="https://nmsl-blog.pages.dev/posts/3858473713/"/>
    <id>https://nmsl-blog.pages.dev/posts/3858473713/</id>
    <published>2026-01-08T10:30:26.158Z</published>
    <updated>2026-01-09T02:08:59.692Z</updated>
    
    <content type="html"><![CDATA[<h1 id="卡登录页面"><a href="#卡登录页面" class="headerlink" title="卡登录页面"></a>卡登录页面</h1><p>需要将代理改成<code>Tun</code>模式或者<code>虚拟网卡</code>模式</p><h1 id="账号不符合要求"><a href="#账号不符合要求" class="headerlink" title="账号不符合要求"></a>账号不符合要求</h1><p>提示<code>Your current account is not eligible for Antigravity, because it is not currently available in your location.</code>，检查是否使用美国的谷歌账号登录，如果没有美国的谷歌账号，则去新注册一个。</p><h1 id="额度问题"><a href="#额度问题" class="headerlink" title="额度问题"></a>额度问题</h1><p>可以使用<a href="https://github.com/lbjlaq/Antigravity-Manager">Antigravity-Manager</a>切换账号，即使不是美国的账号也能使用这个进行切换。</p>]]></content>


    <summary type="html">&lt;h1 id=&quot;卡登录页面&quot;&gt;&lt;a href=&quot;#卡登录页面&quot; class=&quot;headerlink&quot; title=&quot;卡登录页面&quot;&gt;&lt;/a&gt;卡登录页面&lt;/h1&gt;&lt;p&gt;需要将代理改成&lt;code&gt;Tun&lt;/code&gt;模式或者&lt;code&gt;虚拟网卡&lt;/code&gt;模式&lt;/p&gt;
&lt;h1 id=</summary>


    <category term="教程" scheme="https://nmsl-blog.pages.dev/categories/%E6%95%99%E7%A8%8B/"/>
    
    
    <category term="Gemini" scheme="https://nmsl-blog.pages.dev/tags/Gemini/"/>
    
    <category term="薅羊毛" scheme="https://nmsl-blog.pages.dev/tags/%E8%96%85%E7%BE%8A%E6%AF%9B/"/>
    
  </entry>
  
  <entry>
    <title>Cloudflare Pages 本地开发环境构建</title>
    <link href="https://nmsl-blog.pages.dev/posts/3188902425/"/>
    <id>https://nmsl-blog.pages.dev/posts/3188902425/</id>
    <published>2026-01-08T09:47:40.437Z</published>
    <updated>2026-01-09T09:02:17.965Z</updated>
    
    <content type="html"><![CDATA[<h1 id="创建-Vite-React-项目"><a href="#创建-Vite-React-项目" class="headerlink" title="创建 Vite React 项目"></a>创建 Vite React 项目</h1><p>创建一个项目</p><pre><code>npm create vite@latest Liberary -- --template react-tscd Liberarynpm inpm i -D wrangler</code></pre><p>创建数据库</p><pre><code>npx wrangler d1 create liberary_db</code></pre><p>（没能成功返回）（需关闭v2的tun模式，成功返回）</p><p>把输出里的 <code>database_id</code> 等信息写进 <code>wrangler.toml</code>（放在项目根目录）：</p><pre><code>name = "react-liberary"compatibility_date = "2026-01-09"[[d1_databases]]binding = "DB"database_name = "liberart_db"database_id = "xxxxxxxxxxxxxxxxxxxxxxxxxxxx"</code></pre><h1 id="设置本地数据库"><a href="#设置本地数据库" class="headerlink" title="设置本地数据库"></a>设置本地数据库</h1><p>在<code>wrangler.toml</code>的最末尾添加上<code>preview_database_id = "DB"</code></p><h1 id="本地开发两种模式（你选最舒服的）"><a href="#本地开发两种模式（你选最舒服的）" class="headerlink" title="本地开发两种模式（你选最舒服的）"></a>本地开发两种模式（你选最舒服的）</h1><h2 id="模式-A：推荐（热更新）——wrangler-代理-Vite-开发服务器"><a href="#模式-A：推荐（热更新）——wrangler-代理-Vite-开发服务器" class="headerlink" title="模式 A：推荐（热更新）——wrangler 代理 Vite 开发服务器"></a>模式 A：<strong>推荐（热更新）</strong>——wrangler 代理 Vite 开发服务器</h2><p>这个模式最适合 React/Vite：前端继续热更新，同时 Functions + D1 由 wrangler 注入。</p><pre><code>npm run dev</code></pre><p>另开一个终端（同目录）：</p><pre><code>npx wrangler pages dev --d1 DB -- npm run dev</code></pre><ul><li><code>wrangler pages dev</code> 是 Pages 本地开发主命令</li><li><code>--d1 DB</code> 把 D1 绑定挂进本地运行环境（DB 就是你的 binding 名）</li></ul><blockquote><p>如果你发现本地 D1 数据每次重启都没了：看下面“持久化”。</p></blockquote><hr><h2 id="模式-B：构建后用-dist-跑（更接近线上，但没热更新）"><a href="#模式-B：构建后用-dist-跑（更接近线上，但没热更新）" class="headerlink" title="模式 B：构建后用 dist 跑（更接近线上，但没热更新）"></a>模式 B：构建后用 dist 跑（更接近线上，但没热更新）</h2><pre><code>npm run buildnpx wrangler pages dev dist --d1 DB</code></pre><hr><h1 id="本地-D1-建表-迁移-种子数据"><a href="#本地-D1-建表-迁移-种子数据" class="headerlink" title="本地 D1 建表 / 迁移 / 种子数据"></a>本地 D1 建表 / 迁移 / 种子数据</h1><h2 id="直接执行-SQL（本地）"><a href="#直接执行-SQL（本地）" class="headerlink" title="直接执行 SQL（本地）"></a>直接执行 SQL（本地）</h2><figure class="highlight plaintext"><table><tbody><tr><td class="gutter"><pre><span class="line">1</span><br><span class="line">2</span><br></pre></td><td class="code"><pre><span class="line">npx wrangler d1 execute liberart_db --local --command \</span><br><span class="line">"CREATE TABLE IF NOT EXISTS users (id INTEGER PRIMARY KEY, name TEXT);"</span><br></pre></td></tr></tbody></table></figure><h1 id="本地-D1-数据持久化（避免每次重启清空）"><a href="#本地-D1-数据持久化（避免每次重启清空）" class="headerlink" title="本地 D1 数据持久化（避免每次重启清空）"></a>本地 D1 数据持久化（避免每次重启清空）</h1><p>Wrangler 本地数据默认放在 <code>.wrangler/state</code>，也支持用 <code>--persist-to</code> 指定目录（官方在本地数据一章提到这个机制）</p><p>你可以这样跑：</p><figure class="highlight plaintext"><table><tbody><tr><td class="gutter"><pre><span class="line">1</span><br></pre></td><td class="code"><pre><span class="line">npx wrangler pages dev --d1 DB --persist-to .wrangler/state -- npm run dev</span><br></pre></td></tr></tbody></table></figure>]]></content>


    <summary type="html">&lt;h1 id=&quot;创建-Vite-React-项目&quot;&gt;&lt;a href=&quot;#创建-Vite-React-项目&quot; class=&quot;headerlink&quot; title=&quot;创建 Vite React 项目&quot;&gt;&lt;/a&gt;创建 Vite React 项目&lt;/h1&gt;&lt;p&gt;创建一个项目&lt;/p&gt;
&lt;pr</summary>


    <category term="教程" scheme="https://nmsl-blog.pages.dev/categories/%E6%95%99%E7%A8%8B/"/>
    
    
    <category term="Cloudflare" scheme="https://nmsl-blog.pages.dev/tags/Cloudflare/"/>
    
  </entry>
  
  <entry>
    <title>2026年 Gemini 学生优惠认证教程</title>
    <link href="https://nmsl-blog.pages.dev/posts/430679315/"/>
    <id>https://nmsl-blog.pages.dev/posts/430679315/</id>
    <published>2026-01-08T04:24:18.019Z</published>
    <updated>2026-01-08T04:24:19.786Z</updated>
    
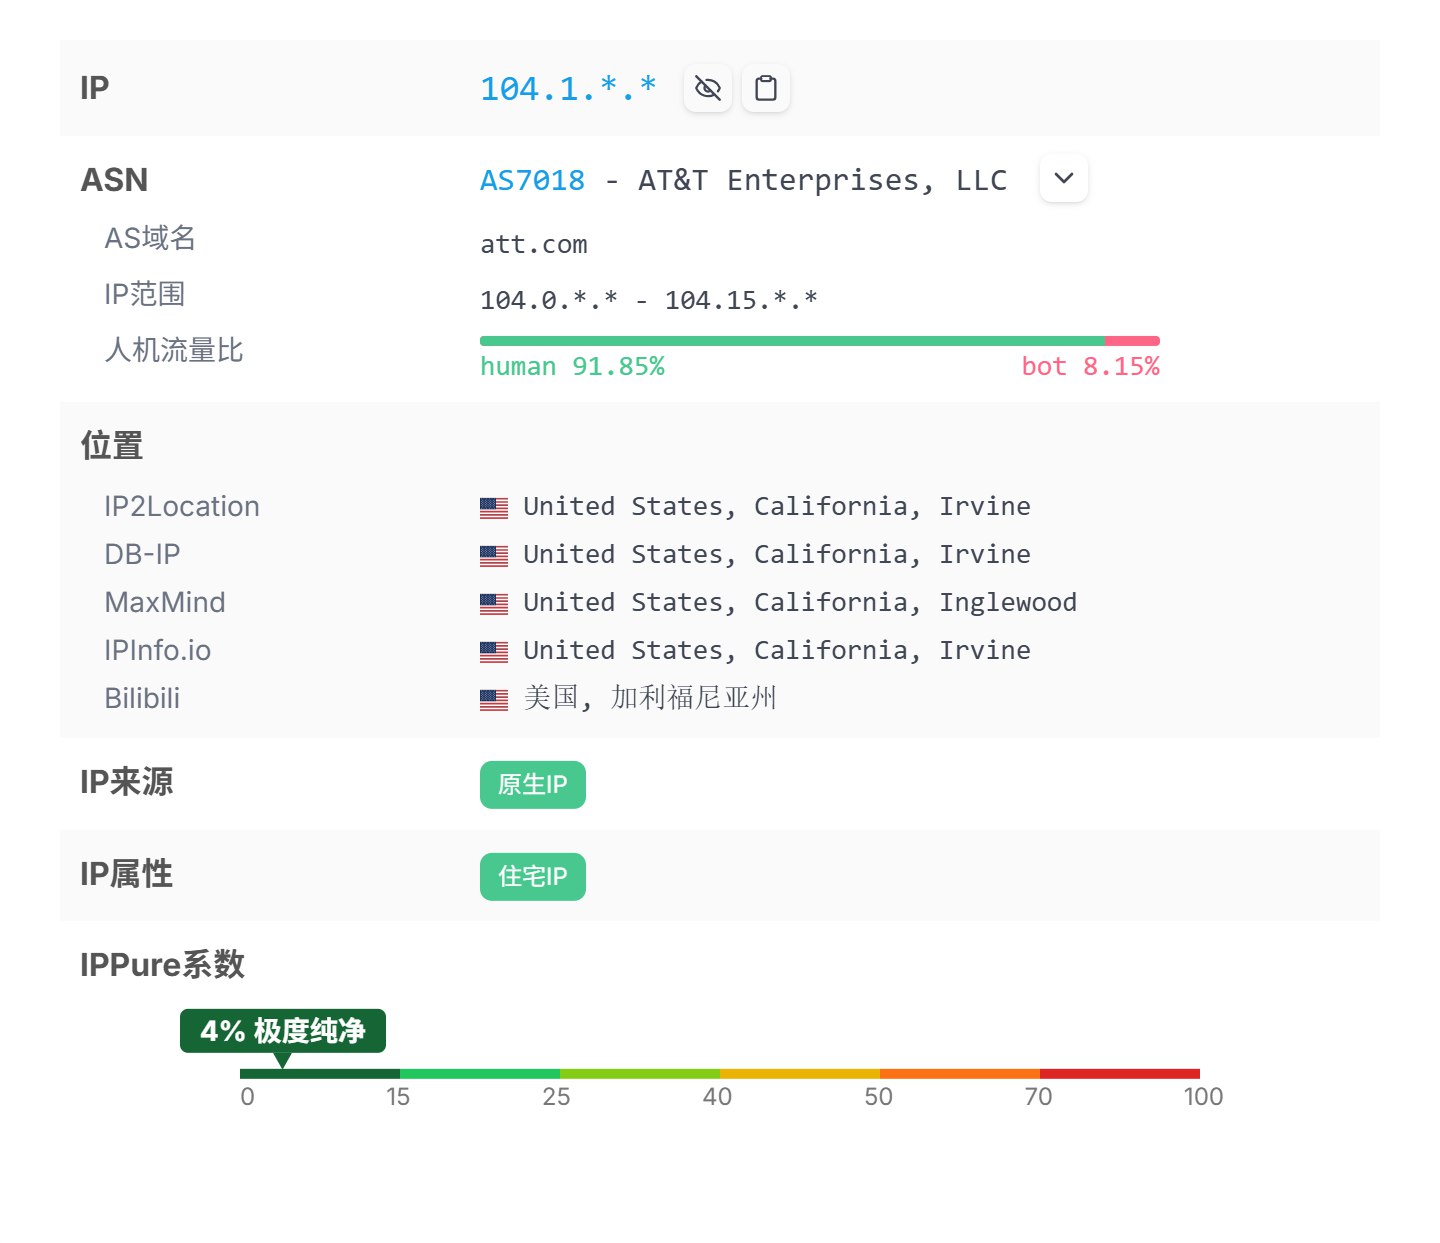
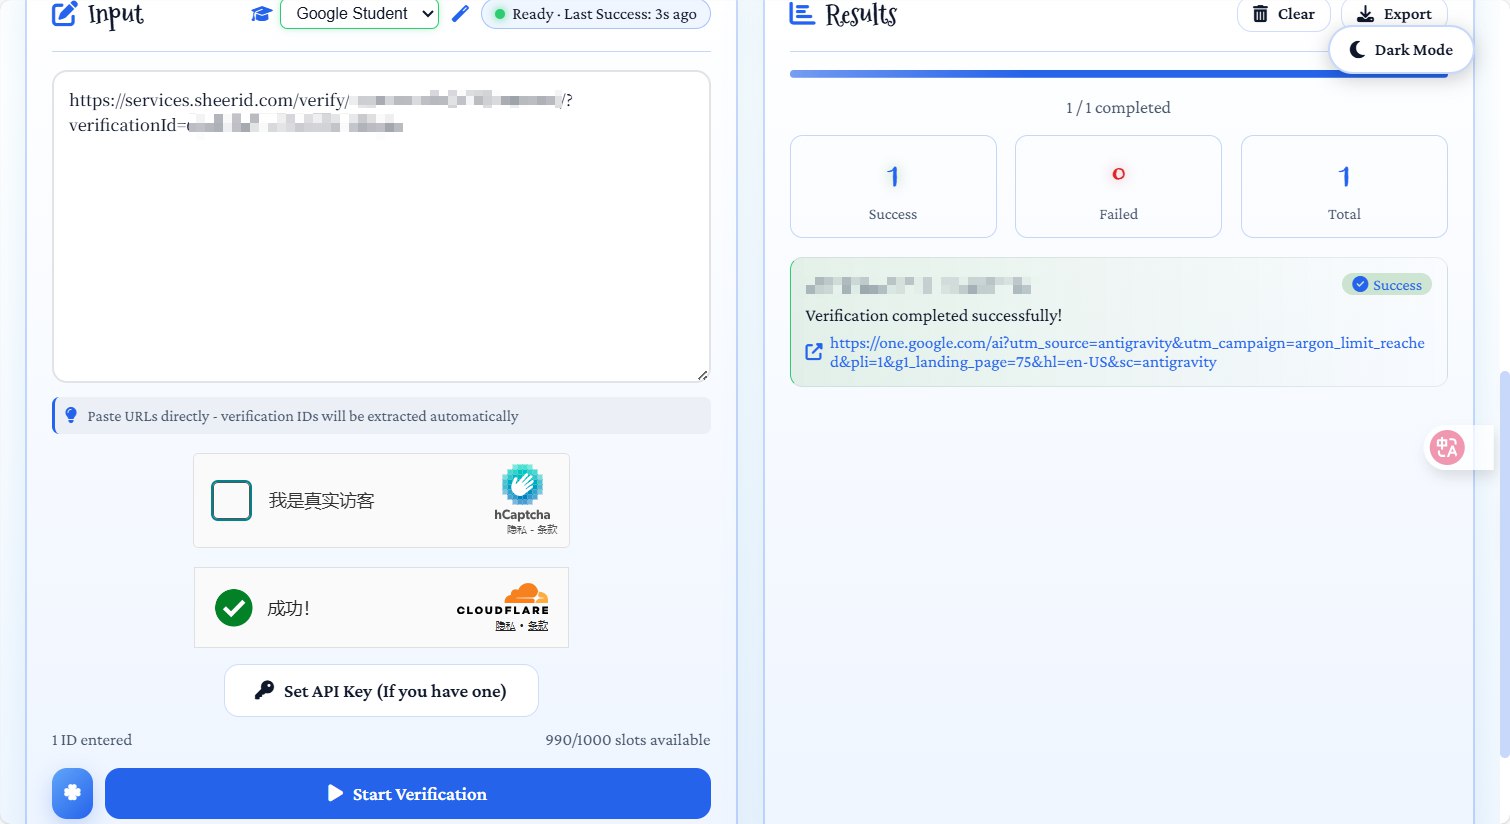
    <content type="html"><![CDATA[<h1 id="验证资格条件"><a href="#验证资格条件" class="headerlink" title="验证资格条件"></a>验证资格条件</h1><p>打开 这里会显示你的 ip 情况。<strong>ip 必须是美国</strong>。确保你的谷歌账号<strong>归属地是美国</strong>。<br><img src="https://img.lin8177.top/file/1767877399093_IPPure-1767877367567.png"></p><p>依我所见，只需要你的IP不是共享的IP，仅需是IDC机房IP，短时间内没有验证过资格的，都能成功打开<a href="https://one.google.com/ai-student">资格审查页面</a>。</p><p><img src="https://img.lin8177.top/file/1767878395404_image.png"></p><p>如没验证，则图中蓝色按钮为验证资格按钮，鼠标右键按钮复制链接，打开<a href="https://batch.1key.me/">SheerID Batch Verifier</a>网站，自助验证资格。</p><p><img src="https://img.lin8177.top/file/1767878559437_image.png"></p><p>右边显示Success则验证成功，如遇失败，则返回验证资格页面，刷新网页，重新复制链接验证（本人验证了四次才成功）。成功只后返回Gemini验证页面，验证资格按钮将会变成下图<code>畅享学生优惠</code>按钮。自行购买$1虚拟卡，进行绑定扣款验证即可使用一年的Gemini Pro。</p><p><img src="https://img.lin8177.top/file/1767878456857_image.png"></p>]]></content>


    <summary type="html">&lt;h1 id=&quot;验证资格条件&quot;&gt;&lt;a href=&quot;#验证资格条件&quot; class=&quot;headerlink&quot; title=&quot;验证资格条件&quot;&gt;&lt;/a&gt;验证资格条件&lt;/h1&gt;&lt;p&gt;打开 这里会显示你的 ip 情况。&lt;strong&gt;ip 必须是美国&lt;/strong&gt;。确保你的谷歌账号&lt;st</summary>


    <category term="教程" scheme="https://nmsl-blog.pages.dev/categories/%E6%95%99%E7%A8%8B/"/>
    
    
    <category term="薅羊毛" scheme="https://nmsl-blog.pages.dev/tags/%E8%96%85%E7%BE%8A%E6%AF%9B/"/>
    
  </entry>
  
  <entry>
    <title>Cloudflare SaaS加速Hexo</title>
    <link href="https://nmsl-blog.pages.dev/posts/1411444449/"/>
    <id>https://nmsl-blog.pages.dev/posts/1411444449/</id>
    <published>2026-01-07T02:16:55.882Z</published>
    <updated>2026-01-09T02:11:21.132Z</updated>
    
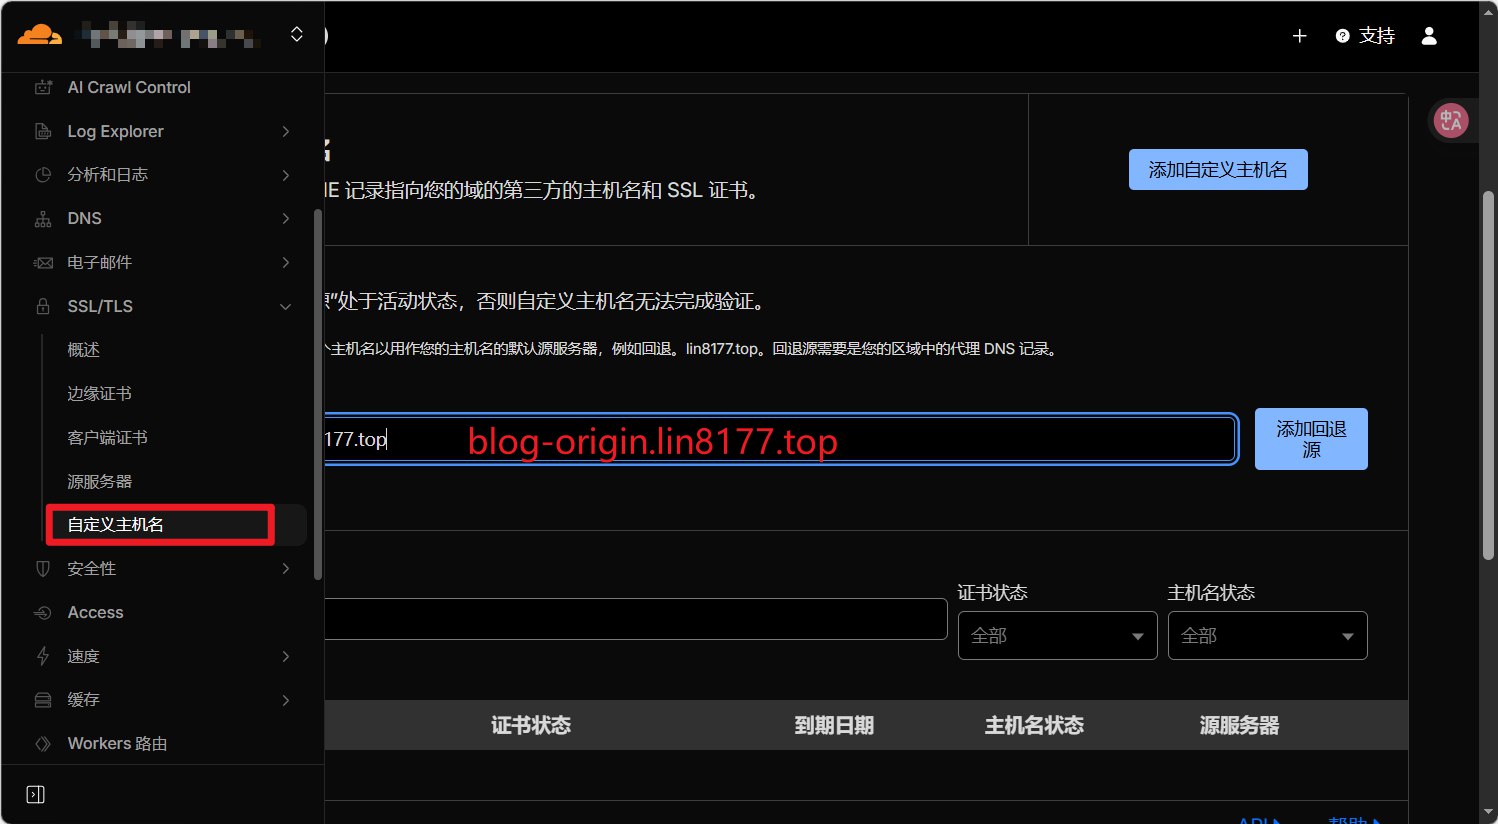
    <content type="html"><![CDATA[<h1 id="域名准备"><a href="#域名准备" class="headerlink" title="域名准备"></a>域名准备</h1><p>首先需要两个域名，例如本站使用<code>https://blog.lin8177.top</code>作为外部访问域名，使用<code>https://blog-origin.lin8177.top</code>作为Cloudflare回源域名。</p><p>将<code>https://blog-origin.lin8177.top</code>设置Pages的自定义源，确保<code>https://blog-origin.lin8177.top</code>能访问到我们的博客</p><h1 id="添加回退源"><a href="#添加回退源" class="headerlink" title="添加回退源"></a>添加回退源</h1><p><img src="https://img.lin8177.top/file/1767781871620_image.png"></p><ul><li>进入到Cloudflare域名管理界面 -&gt; SSL/TLS -&gt; 自定义主机名 -&gt; 添加一个回退源</li><li>回退源地址即为我们刚才解析blog-origin.lin8177.top</li></ul><h1 id="添加自定义主机名"><a href="#添加自定义主机名" class="headerlink" title="添加自定义主机名"></a>添加自定义主机名</h1><p>添加<code>https://blog.lin8177.top</code>，并添加txt记录验证</p><h1 id="解析"><a href="#解析" class="headerlink" title="解析"></a>解析</h1><p>添加<code>CNAME</code>解析，设置<code>blog</code>指向一个优选域名，例如<code>csgo.com</code>（需要不同在另一个DNS服务商设置，CF现在不支持跨账号CNAME）</p>]]></content>


    <summary type="html">&lt;h1 id=&quot;域名准备&quot;&gt;&lt;a href=&quot;#域名准备&quot; class=&quot;headerlink&quot; title=&quot;域名准备&quot;&gt;&lt;/a&gt;域名准备&lt;/h1&gt;&lt;p&gt;首先需要两个域名，例如本站使用&lt;code&gt;https://blog.lin8177.top&lt;/code&gt;作为外部访问域名，使</summary>


    <category term="教程" scheme="https://nmsl-blog.pages.dev/categories/%E6%95%99%E7%A8%8B/"/>
    
    
    <category term="Cloudflare" scheme="https://nmsl-blog.pages.dev/tags/Cloudflare/"/>
    
  </entry>
  
  <entry>
    <title>Hexo推送Cloudflare</title>
    <link href="https://nmsl-blog.pages.dev/posts/1811912541/"/>
    <id>https://nmsl-blog.pages.dev/posts/1811912541/</id>
    <published>2026-01-06T12:39:53.627Z</published>
    <updated>2026-01-07T01:53:44.153Z</updated>
    
    <content type="html"><![CDATA[<h1 id="构建静态页面"><a href="#构建静态页面" class="headerlink" title="构建静态页面"></a>构建静态页面</h1><p>构建静态页面并推送Github</p><pre><code>hexo clean &amp;&amp; hexo g &amp;&amp; hexo d</code></pre><h1 id="Cloudflare部署"><a href="#Cloudflare部署" class="headerlink" title="Cloudflare部署"></a>Cloudflare部署</h1><p>创建一个pages项目，用选择Github项目作为源，确定即可，添加自定义域名即可使用Cloudflare作为服务端</p>]]></content>


    <summary type="html">&lt;h1 id=&quot;构建静态页面&quot;&gt;&lt;a href=&quot;#构建静态页面&quot; class=&quot;headerlink&quot; title=&quot;构建静态页面&quot;&gt;&lt;/a&gt;构建静态页面&lt;/h1&gt;&lt;p&gt;构建静态页面并推送Github&lt;/p&gt;
&lt;pre&gt;&lt;code&gt;hexo clean &amp;amp;&amp;amp; h</summary>


    <category term="教程" scheme="https://nmsl-blog.pages.dev/categories/%E6%95%99%E7%A8%8B/"/>
    
    
    <category term="Cloudflare" scheme="https://nmsl-blog.pages.dev/tags/Cloudflare/"/>
    
    <category term="Hexo" scheme="https://nmsl-blog.pages.dev/tags/Hexo/"/>
    
  </entry>
  
  <entry>
    <title>Hexo主题美化-第三期</title>
    <link href="https://nmsl-blog.pages.dev/posts/686321700/"/>
    <id>https://nmsl-blog.pages.dev/posts/686321700/</id>
    <published>2026-01-06T09:59:49.000Z</published>
    <updated>2026-01-06T09:59:49.000Z</updated>
    
    <content type="html"><![CDATA[<h1 id="设置头像不旋转"><a href="#设置头像不旋转" class="headerlink" title="设置头像不旋转"></a>设置头像不旋转</h1><p>当鼠标移到侧边栏头像上时，头像会播放旋转动效，要想禁用可以找到<br><code>themes\butterfly\source\css_layout\aside.styl</code>文件并按照如下对<code>transform: unset</code>修改即可完成动效屏蔽。</p><pre><code>.avatar-img  overflow: hidden  margin: 0 auto  width: 110px  height: 110px  border-radius: 70px  img    width: 100%    height: 100%    transition: filter 375ms ease-in .2s, transform .3s    object-fit: cover    &amp;:hover      transform: unset</code></pre><h1 id="Butterfly主题升级问题"><a href="#Butterfly主题升级问题" class="headerlink" title="Butterfly主题升级问题"></a>Butterfly主题升级问题</h1><p>为了減少升级主题带来的不便，我们还需要做以下操作：<br>把主题文件夹中的 <code>_config.yml</code> 复制到 Hexo 根目录下，同重命名为 <code>_config.butterfly.yml</code></p><h1 id="代码块美化"><a href="#代码块美化" class="headerlink" title="代码块美化"></a>代码块美化</h1><pre><code># Code Blocks (代码块样式)# --------------------------------------highlight_theme: mac #  darker / pale night / light / ocean / mac / mac light / falsehighlight_copy: true # copy button 是否显示复制按钮highlight_lang: true # show the code language 展示代码块语言highlight_shrink: false # true: 打开文章默认折叠代码块内容 / false: 打开文章默认展开代码块内容highlight_height_limit: false # unit: pxcode_word_wrap: true #是否关闭横向滚动条（自动换行）</code></pre><h1 id="图片加载失败动画"><a href="#图片加载失败动画" class="headerlink" title="图片加载失败动画"></a>图片加载失败动画</h1><pre><code># 安装插件npm install hexo-lazyload-image --save</code></pre><p>在主目录配置文件_config.yml增加配置</p><pre><code>lazyload:  enable: true  loadingImg: /img/loading.gif</code></pre><h1 id="侧边栏样式"><a href="#侧边栏样式" class="headerlink" title="侧边栏样式"></a>侧边栏样式</h1><p>以下修改主题配置文件<code>_config.butterfly.yml</code></p><p>侧边栏位置</p><pre><code>aside:  enable: true  hide: false  button: true  mobile: true # display on mobile  position: right # left or right 我的是右边</code></pre><p>个人信息</p><pre><code>...card_author:    enable: true    description:    button:      enable: true      icon: fab fa-github      text: Follow Me #按钮文字      link: https://github.com/xxxxxx #可以放上自己的github地址    </code></pre><p>社交图标</p><pre><code># social settings (社交圖標設置)# formal:#        icon: link || the description#书写格式：图标名：url || 描述性文字`social:   fab fa-github: https://githubfast.com/lyr233 || Github   fa fa-book-open: https://blog.csdn.net/YR_112233 || CSDN   fab fa-qq:  tencent://AddContact/?fromId=45&amp;fromSubId=1&amp;subcmd=all&amp;uin=728831102&amp;website=www.oicqzone.com || QQ   fas fa-envelope-open-text: mailto:728831102@qq.com || Email</code></pre><p>公告栏设置</p><pre><code>...card_announcement:    enable: true    content: This is my Blog #修改公告栏信息</code></pre><h1 id="字数统计"><a href="#字数统计" class="headerlink" title="字数统计"></a>字数统计</h1><pre><code>npm install hexo-wordcount --save</code></pre><p>编辑主题配置文件</p><pre><code># wordcount (字數統計)wordcount:  enable: true  post_wordcount: true  min2read: true  total_wordcount: true</code></pre><h1 id="社交图标不旋转"><a href="#社交图标不旋转" class="headerlink" title="社交图标不旋转"></a>社交图标不旋转</h1><p>编辑<code>themes/butterfly/source/css/_layout/aside.styl</code>，找到<code>social-icon</code>，设置<code>transform</code>为<code>unset</code></p><h1 id="设置浏览量"><a href="#设置浏览量" class="headerlink" title="设置浏览量"></a>设置浏览量</h1><p>参考<a href="https://busuanzi.apifox.cn/">自建不蒜子</a>页面搭建不蒜子服务，并修改主题文件</p><pre><code># 修改APIinject:  bottom:    - &lt;script defer pjax data-api="https://busuanzi.lin8177.top/api" data-prefix="busuanzi_value" src="https://busuanzi.lin8177.top/js"&gt;&lt;/script&gt;# 修改CDNbusuanzi: https://example.com/js</code></pre><h1 id="修改导航栏常驻"><a href="#修改导航栏常驻" class="headerlink" title="修改导航栏常驻"></a>修改导航栏常驻</h1><p>主题配置文件中修改成下方样式</p><pre><code>nav:  logo:    display_title: true    display_post_title: true    fixed: false</code></pre><h1 id="加载页面"><a href="#加载页面" class="headerlink" title="加载页面"></a>加载页面</h1><p>修改主题配置文件夹</p><pre><code>preloader:  enable: true           # 开启加载页面  load_style: 1          # 样式（1 / 2）</code></pre>]]></content>


    <summary type="html">&lt;h1 id=&quot;设置头像不旋转&quot;&gt;&lt;a href=&quot;#设置头像不旋转&quot; class=&quot;headerlink&quot; title=&quot;设置头像不旋转&quot;&gt;&lt;/a&gt;设置头像不旋转&lt;/h1&gt;&lt;p&gt;当鼠标移到侧边栏头像上时，头像会播放旋转动效，要想禁用可以找到&lt;br&gt;&lt;code&gt;themes&#92;bu</summary>


    <category term="教程" scheme="https://nmsl-blog.pages.dev/categories/%E6%95%99%E7%A8%8B/"/>
    
    
    <category term="Hexo" scheme="https://nmsl-blog.pages.dev/tags/Hexo/"/>
    
  </entry>
  
  <entry>
    <title>Hexo主题美化-第二期</title>
    <link href="https://nmsl-blog.pages.dev/posts/1710674806/"/>
    <id>https://nmsl-blog.pages.dev/posts/1710674806/</id>
    <published>2026-01-06T05:14:06.000Z</published>
    <updated>2026-01-06T05:14:06.000Z</updated>
    
    <content type="html"><![CDATA[<h1 id="Hexo-主题美化"><a href="#Hexo-主题美化" class="headerlink" title="Hexo 主题美化"></a>Hexo 主题美化</h1><h2 id="自定义图标"><a href="#自定义图标" class="headerlink" title="自定义图标"></a>自定义图标</h2><ol><li><p>在 <a href="https://www.iconfont.cn/">iconfont-阿里巴巴矢量图标库</a> 中找到你喜欢的图标并添加到自己的项目里。</p></li><li><p>下载项目到本地。</p></li><li><p>在主题的 <code>_config.yml</code> 文件中修改 <code>menu</code> 部分，类似如下格式：</p><pre><code>menu:  首页: / || iconfont icon-shouye  时间线: /archives/ || iconfont icon-riqi  标签: /tags/ || iconfont icon-biaoqian  分类: /categories/ || iconfont icon-fenlei21  关于: /about/ || iconfont icon-guanyuwomen</code></pre></li></ol><h2 id="自定义鼠标"><a href="#自定义鼠标" class="headerlink" title="自定义鼠标"></a>自定义鼠标</h2><ol><li><p>在<a href="https://zhutix.com/tag/mouse/">致美化</a>或<a href="https://www.manfen.net/pointer/">漫锋网</a>等网站挑选喜欢的鼠标指针样式并下载。</p></li><li><p><strong>格式转换</strong>：</p><ul><li>浏览器通常使用 <code>.cur</code> 格式的鼠标指针文件。如果你下载的是 <code>.ani</code> 格式，需要进行转换。</li><li>可以使用 <a href="https://www.axialis.com/cursorworkshop/">CursorWorkshop</a> 等工具将 <code>.ani</code> 文件转换为 <code>.gif</code>。</li><li>然后使用在线工具（如 <a href="https://convertio.co/zh/gif-cur/">GIF to CUR Converter</a>）将 <code>.gif</code> 文件转换为 <code>.cur</code>。</li></ul></li><li><p>将转换后的 <code>.cur</code> 文件（例如：<code>default.cur</code>, <code>pointer.cur</code>, <code>text.cur</code> 等）放置到你主题的 <code>source/images</code> 或类似目录下。</p></li><li><p>在你的主题自定义 CSS 文件中添加以下代码，并确保 <code>url()</code> 中的路径正确指向你的 <code>.cur</code> 文件。</p><pre><code>/* 全局默认鼠标指针 */body,html {    cursor: url('/images/mouse/default.cur'), auto !important;}/* 链接悬停时的鼠标指针 */a,button,.btn {    cursor: url('/images/mouse/pointer.cur'), auto !important;}/* 文本选择时的鼠标指针 */input,textarea {    cursor: url('/images/mouse/text.cur'), auto;}/* 图片悬停时的鼠标指针 */img:hover {    cursor: url('/images/mouse/zoom-in.cur'), auto !important;}/* 其他特定元素的悬停样式 */#nav .site-page:hover,#pagination .page-number:hover,#footer-wrap a:hover {    cursor: url('/images/mouse/pointer.cur'), auto;}</code></pre></li><li><p>重新部署你的 Hexo 博客 (<code>hexo clean &amp;&amp; hexo g &amp;&amp; hexo d</code>) 即可看到效果。</p></li></ol>]]></content>


    <summary type="html">&lt;h1 id=&quot;Hexo-主题美化&quot;&gt;&lt;a href=&quot;#Hexo-主题美化&quot; class=&quot;headerlink&quot; title=&quot;Hexo 主题美化&quot;&gt;&lt;/a&gt;Hexo 主题美化&lt;/h1&gt;&lt;h2 id=&quot;自定义图标&quot;&gt;&lt;a href=&quot;#自定义图标&quot; class=&quot;header</summary>


    <category term="教程" scheme="https://nmsl-blog.pages.dev/categories/%E6%95%99%E7%A8%8B/"/>
    
    
    <category term="Hexo" scheme="https://nmsl-blog.pages.dev/tags/Hexo/"/>
    
  </entry>
  
  <entry>
    <title>Hexo主题美化-第一期</title>
    <link href="https://nmsl-blog.pages.dev/posts/1440759726/"/>
    <id>https://nmsl-blog.pages.dev/posts/1440759726/</id>
    <published>2026-01-06T02:36:39.000Z</published>
    <updated>2026-01-06T11:13:56.627Z</updated>
    
    <content type="html"><![CDATA[<h1 id="Hexo-博客搭建-美化教程"><a href="#Hexo-博客搭建-美化教程" class="headerlink" title="Hexo 博客搭建 &amp; 美化教程"></a>Hexo 博客搭建 &amp; 美化教程</h1><p>本网站是用 Hexo + GitHub 部署的，用的是 butterfly 主题。</p><p><strong>优点：</strong> 完全免费（所以我才用的这个🤣)，静态站点，轻量快速，可按需求自由定制改造；托管在 GitHub，安全省心；迁移方便……<br><strong>不足：</strong> 发文不便，依赖本地环境；更适合个人博客使用（其实也还好，写文章得用 markdown 语法，不会也没关系，有 Typora 编辑器就行）。</p><p><strong>教程推荐：</strong> <a href="https://jerryc.me/posts/21cf193d/">hexo + github + butterfly 搭建你的个人博客保姆级教程（无需云服务器）</a></p><p>按照上面的教程搭建就行，大致是让你配置 node.js, git, 然后安装 Hexo , 更换 butterfly 主题, 再部署到 github 上。</p><blockquote><p>各种教程都让你用 <code>git bash</code> 打开你的 blog 文件夹，但现在 <code>powershell</code> 也可以（至少我的电脑上能这样用）。</p></blockquote><hr><h2 id="基本命令"><a href="#基本命令" class="headerlink" title="基本命令"></a>基本命令</h2><p><strong>预览：</strong></p><pre><code>hexo s</code></pre><p>实现”预览” 。启动一个本地的 Web 服务器（<code>http://localhost:4000/</code>），让你预览内容，<code>CTRL+C</code> 退出。</p><p><strong>三剑客（每次改动都要执行这 3 个命令重新部署网站）：</strong></p><pre><code>hexo cleanhexo ghexo d</code></pre><p><strong>写博客：</strong></p><pre><code>hexo new post &lt;博客名&gt;</code></pre><p>生成一个 <code>.md</code> 文件在 <code>blog\source\_posts</code> 文件夹中，写完后再执行一遍三剑客即可。</p><hr><h2 id="开始美化"><a href="#开始美化" class="headerlink" title="开始美化"></a>开始美化</h2><p>butterfly 主题的初步美化，可以参考作者文档：<a href="https://butterfly.js.org/">https://butterfly.js.org/</a></p><p><strong>核心配置文件：</strong></p><ul><li>修改站点配置文件为 <code>_config.yml</code>，路径为 <code>blog\_config.yml</code></li><li>修改主题配置文件为 <code>_config.butterfly.yml</code>，路径为 <code>blog\themes\butterfly\_config.yml</code></li></ul><h3 id="Front-matter"><a href="#Front-matter" class="headerlink" title="Front-matter"></a>Front-matter</h3><p>Front-matter 是 markdown 文件最上方以 <code>---</code> 分隔的区域，用于配置文章。</p><p><strong>写法解释:</strong></p><ul><li><code>title</code>【必需】页面标题</li><li><code>date</code>【必需】页面创建日期</li><li><code>type</code>【必需】标签、分类和友情链接三个页面需要配置</li><li><code>updated</code>【可选】页面更新日期</li><li><code>description</code>【可选】页面描述</li><li><code>keywords</code>【可选】页面关键字</li><li><code>comments</code>【可选】显示页面评论模块 (默认 <code>true</code>)</li><li><code>top_img</code>【可选】页面顶部图片</li><li><code>aside</code>【可选】显示侧边栏 (默认 <code>true</code>)</li></ul><h3 id="网站资料"><a href="#网站资料" class="headerlink" title="网站资料"></a>网站资料</h3><p>修改站点配置文件 <code>_config.yml</code>：</p><table><thead><tr><th align="left">参数</th><th align="left">描述</th></tr></thead><tbody><tr><td align="left"><code>title</code></td><td align="left">网站标题</td></tr><tr><td align="left"><code>subtitle</code></td><td align="left">副标题</td></tr><tr><td align="left"><code>description</code></td><td align="left">网站描述</td></tr><tr><td align="left"><code>author</code></td><td align="left">你的名字</td></tr><tr><td align="left"><code>language</code></td><td align="left">建议设成 <code>zh-CN</code></td></tr></tbody></table><h3 id="头像"><a href="#头像" class="headerlink" title="头像"></a>头像</h3><p>在主题配置文件中找到 <code>avatar</code>：</p><pre><code>avatar:  img: /assets/head.jpg  effect: false # true则会一直转圈</code></pre><h3 id="背景"><a href="#背景" class="headerlink" title="背景"></a>背景</h3><p>修改主题配置文件 <code>_config.butterfly.yml</code>：</p><pre><code># 图片格式 url(http://xxxxxx.com/xxx.jpg)background: url(https://your_image_url/img/dm1.png)</code></pre><h3 id="导航菜单栏"><a href="#导航菜单栏" class="headerlink" title="导航菜单栏"></a>导航菜单栏</h3><p>修改主题配置文件 <code>_config.butterfly.yml</code>：</p><pre><code>menu:  Home: / || fas fa-home  Archives: /archives/ || fas fa-archive  Tags: /tags/ || fas fa-tags  Categories: /categories/ || fas fa-folder-open  List||fas fa-list:    Music: /music/ || fas fa-music    Movie: /movies/ || fas fa-video  Link: /link/ || fas fa-link  About: /about/ || fas fa-heart</code></pre><h3 id="文章设置"><a href="#文章设置" class="headerlink" title="文章设置"></a>文章设置</h3><h4 id="封面与置顶"><a href="#封面与置顶" class="headerlink" title="封面与置顶"></a>封面与置顶</h4><ul><li><strong>置顶：</strong> 在文章 front-matter 添加 <code>sticky: 1</code>。</li><li><strong>封面：</strong> 在 front-matter 添加 <code>cover: 图片地址</code>。</li></ul><h4 id="文章版权"><a href="#文章版权" class="headerlink" title="文章版权"></a>文章版权</h4><p>修改主题配置文件 <code>_config.butterfly.yml</code>：</p><pre><code>post_copyright:  enable: true  license: CC BY-NC-SA 4.0  license_url: https://creativecommons.org/licenses/by-nc-sa/4.0/</code></pre><h3 id="本地搜索"><a href="#本地搜索" class="headerlink" title="本地搜索"></a>本地搜索</h3><ol><li><p><strong>安装依赖：</strong></p><pre><code>npm install hexo-generator-search --save</code></pre></li><li><p><strong>站点配置 <code>_config.yml</code>：</strong></p><pre><code>search:  path: search.xml  field: post  content: true</code></pre></li><li><p><strong>主题配置 <code>_config.butterfly.yml</code>：</strong></p><pre><code>local_search:  enable: true</code></pre></li></ol>]]></content>


    <summary type="html">&lt;h1 id=&quot;Hexo-博客搭建-美化教程&quot;&gt;&lt;a href=&quot;#Hexo-博客搭建-美化教程&quot; class=&quot;headerlink&quot; title=&quot;Hexo 博客搭建 &amp;amp; 美化教程&quot;&gt;&lt;/a&gt;Hexo 博客搭建 &amp;amp; 美化教程&lt;/h1&gt;&lt;p&gt;本网站是用 Hexo</summary>


    <category term="教程" scheme="https://nmsl-blog.pages.dev/categories/%E6%95%99%E7%A8%8B/"/>
    
    
    <category term="Hexo" scheme="https://nmsl-blog.pages.dev/tags/Hexo/"/>
    
  </entry>
  
  <entry>
    <title>Hexo搭建和部署</title>
    <link href="https://nmsl-blog.pages.dev/posts/3349434990/"/>
    <id>https://nmsl-blog.pages.dev/posts/3349434990/</id>
    <published>2026-01-05T14:27:58.000Z</published>
    <updated>2026-01-09T02:09:24.204Z</updated>
    
    <content type="html"><![CDATA[<h1 id="安装nodejs环境"><a href="#安装nodejs环境" class="headerlink" title="安装nodejs环境"></a>安装nodejs环境</h1><p>安装nodejs 24.12 LTS</p><pre><code># 升级软件包sudo apt update sudo apt upgrade -y# 安装nodejs 24LTSsudo apt install -y node npmcurl -fsSL https://deb.nodesource.com/setup_24.x | sudo -E bash -sudo apt install -y nodejs</code></pre><h1 id="初始化Hexo"><a href="#初始化Hexo" class="headerlink" title="初始化Hexo"></a>初始化Hexo</h1><pre><code># 创建blog文件夹mkdir blog &amp;&amp; cd blog# 初始化hexo init# 编译hexo g# 部署hexo s</code></pre><h1 id="butterfiy主题"><a href="#butterfiy主题" class="headerlink" title="butterfiy主题"></a>butterfiy主题</h1><h2 id="安装主题"><a href="#安装主题" class="headerlink" title="安装主题"></a>安装主题</h2><pre><code># 安装主题依赖npm install hexo-renderer-pug hexo-renderer-stylus# 安装主题git clone -b master https://github.com/jerryc127/hexo-theme-butterfly.git themes/butterfly</code></pre><h2 id="配置主题"><a href="#配置主题" class="headerlink" title="配置主题"></a>配置主题</h2><p>打开blog目录下的<code>_config.yml</code>配置文件，修改成<code>theme: butterfly</code></p><h1 id="配置Github"><a href="#配置Github" class="headerlink" title="配置Github"></a>配置Github</h1><pre><code># 安装依赖npm install hexo-deployer-git --save</code></pre><p>创建一个仓库，命名方式为<code>你的github用户名.github.io</code>，复制https地址，打开本地博客的配置文件<code>_config.yml</code>，在<code>deploy</code>下输入以下内容：</p><pre><code>deploy:  type: 'git'  repo: https://github.com/aa/aa.github.io.git  branch: main</code></pre><p>配置 Git 身份信息，在终端运行以下两条命令</p><pre><code># 配置Github信息git config --global user.email "your_email@example.com"git config --global user.name "Your Name"git config --global credential.helper store</code></pre><p>配置Github TOKEN，进入GitHub -&gt; Settings -&gt; Developer settings -&gt; Personal access tokens -&gt; Tokens (classic)</p><pre><code># 重新部署并上传Githubhexo clean &amp;&amp; hexo g &amp;&amp; hexo d#根据提示输入Github的邮箱和上述TOKEN</code></pre>]]></content>


    <summary type="html">&lt;h1 id=&quot;安装nodejs环境&quot;&gt;&lt;a href=&quot;#安装nodejs环境&quot; class=&quot;headerlink&quot; title=&quot;安装nodejs环境&quot;&gt;&lt;/a&gt;安装nodejs环境&lt;/h1&gt;&lt;p&gt;安装nodejs 24.12 LTS&lt;/p&gt;
&lt;pre&gt;&lt;code&gt;# 升级</summary>


    <category term="教程" scheme="https://nmsl-blog.pages.dev/categories/%E6%95%99%E7%A8%8B/"/>
    
    
    <category term="Hexo" scheme="https://nmsl-blog.pages.dev/tags/Hexo/"/>
    
  </entry>
  
  <entry>
    <title>如何部署本地 AI 画图</title>
    <link href="https://nmsl-blog.pages.dev/posts/32a7cd0a/"/>
    <id>https://nmsl-blog.pages.dev/posts/32a7cd0a/</id>
    <published>2025-04-24T09:13:16.367Z</published>
    <updated>2025-04-24T09:35:47.634Z</updated>
    
    <content type="html"><![CDATA[<p>在这篇文章中，我们将介绍如何使用 <code>sd-webui-forge-aki-v1.0</code> 部署本地 AI 绘图系统。<code>sd-webui-forge-aki-v1.0</code> 是一个强大的工具，可以帮助我们通过稳定扩散 (Stable Diffusion) 技术来生成图像。它允许用户将 AI 绘图模型部署到本地计算机上，进行更加灵活且私密的操作。</p><hr><h2 id="下载整合包"><a href="#下载整合包" class="headerlink" title="下载整合包"></a>下载整合包</h2><p>进入<a href="https://space.bilibili.com/12566101">秋叶aaaki</a>的b站首页，下载最新版整合包</p><h2 id="运行整合包"><a href="#运行整合包" class="headerlink" title="运行整合包"></a>运行整合包</h2><p>正常情况下启动整合包会自动下载依赖，所以尽情玩吧</p>]]></content>


    <summary type="html">&lt;p&gt;在这篇文章中，我们将介绍如何使用 &lt;code&gt;sd-webui-forge-aki-v1.0&lt;/code&gt; 部署本地 AI 绘图系统。&lt;code&gt;sd-webui-forge-aki-v1.0&lt;/code&gt; 是一个强大的工具，可以帮助我们通过稳定扩散 (Stable Dif</summary>


  </entry>
  
  <entry>
    <title>yolov5半自动训练</title>
    <link href="https://nmsl-blog.pages.dev/posts/fec3708d/"/>
    <id>https://nmsl-blog.pages.dev/posts/fec3708d/</id>
    <published>2025-01-24T04:50:39.353Z</published>
    <updated>2025-01-24T04:53:05.209Z</updated>
    
    <content type="html"><![CDATA[<h2 id="下载源码"><a href="#下载源码" class="headerlink" title="下载源码"></a>下载源码</h2><p>打开git bash，运行以下命令</p><figure class="highlight plaintext"><table><tbody><tr><td class="gutter"><pre><span class="line">1</span><br></pre></td><td class="code"><pre><span class="line">git clone https://github.com/cnyvfang/labelGo-Yolov5AutoLabelImg.git</span><br></pre></td></tr></tbody></table></figure><p>进入文件夹</p><h2 id="修改类别"><a href="#修改类别" class="headerlink" title="修改类别"></a>修改类别</h2><p>/data/predefined_classes.txt下，修改类别</p><p>将进行训练自己标注的数据的yolov5文件里的utils文件拷贝到labelGo-Yolov5AutoLabelImg-5_v5_source文件夹里。将yolov5/mode文件夹里的yolo.py，拷贝到labelGo-Yolov5AutoLabelImg-5_v5_source/libs/models</p><p>切换中文版本请编辑\libs\stringBundle.py</p><p>libs目录下运行pyrcc5 ../resources.qrc -o resources.py</p>]]></content>


    <summary type="html">&lt;h2 id=&quot;下载源码&quot;&gt;&lt;a href=&quot;#下载源码&quot; class=&quot;headerlink&quot; title=&quot;下载源码&quot;&gt;&lt;/a&gt;下载源码&lt;/h2&gt;&lt;p&gt;打开git bash，运行以下命令&lt;/p&gt;
&lt;figure class=&quot;highlight plaintext&quot;&gt;&lt;tab</summary>


    <category term="软件教程" scheme="https://nmsl-blog.pages.dev/categories/%E8%BD%AF%E4%BB%B6%E6%95%99%E7%A8%8B/"/>
    
    
    <category term="软件教程" scheme="https://nmsl-blog.pages.dev/tags/%E8%BD%AF%E4%BB%B6%E6%95%99%E7%A8%8B/"/>
    
  </entry>
  
  <entry>
    <title>本地部署ai大模型01：安装cuda</title>
    <link href="https://nmsl-blog.pages.dev/posts/8ddd4d0c/"/>
    <id>https://nmsl-blog.pages.dev/posts/8ddd4d0c/</id>
    <published>2025-01-20T11:07:40.670Z</published>
    <updated>2025-01-20T11:07:43.296Z</updated>
    
    <content type="html"><![CDATA[<h2 id="本地部署ai大模型01：安装cuda-cudnn"><a href="#本地部署ai大模型01：安装cuda-cudnn" class="headerlink" title="本地部署ai大模型01：安装cuda&amp;cudnn"></a>本地部署ai大模型01：安装cuda&amp;cudnn</h2><h2 id="cuda安装"><a href="#cuda安装" class="headerlink" title="cuda安装"></a>cuda安装</h2><p>打开nvidia控制面板-系统信息-组件，查看cuda版本<img src="https://lin8177.oss-cn-shenzhen.aliyuncs.com/20250120191011.png"></p><p>进入<a href="https://developer.nvidia.com/cuda-downloads">cuda toolkit网站</a>，选择对应的系统和架构，进行下载。</p><p><img src="https://lin8177.oss-cn-shenzhen.aliyuncs.com/20250120191404.png"></p><figure class="highlight plaintext"><table><tbody><tr><td class="gutter"><pre><span class="line">1</span><br><span class="line">2</span><br></pre></td><td class="code"><pre><span class="line">最高版本：nvidia-smi</span><br><span class="line">当前版本：nvcc --version</span><br></pre></td></tr></tbody></table></figure><p>观察到输出即可。</p><hr><h2 id="cudnn安装"><a href="#cudnn安装" class="headerlink" title="cudnn安装"></a>cudnn安装</h2>]]></content>


    <summary type="html">&lt;h2 id=&quot;本地部署ai大模型01：安装cuda-cudnn&quot;&gt;&lt;a href=&quot;#本地部署ai大模型01：安装cuda-cudnn&quot; class=&quot;headerlink&quot; title=&quot;本地部署ai大模型01：安装cuda&amp;amp;cudnn&quot;&gt;&lt;/a&gt;本地部署ai大模型0</summary>


    <category term="软件教程" scheme="https://nmsl-blog.pages.dev/categories/%E8%BD%AF%E4%BB%B6%E6%95%99%E7%A8%8B/"/>
    
    
    <category term="软件教程" scheme="https://nmsl-blog.pages.dev/tags/%E8%BD%AF%E4%BB%B6%E6%95%99%E7%A8%8B/"/>
    
  </entry>
  
  <entry>
    <title>免费获取阿里云ECS</title>
    <link href="https://nmsl-blog.pages.dev/posts/46f23c9d/"/>
    <id>https://nmsl-blog.pages.dev/posts/46f23c9d/</id>
    <published>2025-01-18T00:46:47.798Z</published>
    <updated>2025-01-18T00:48:00.396Z</updated>
    
    <content type="html"><![CDATA[<h2 id="领取优惠券"><a href="#领取优惠券" class="headerlink" title="领取优惠券"></a>领取优惠券</h2><p>首先，你得是大学牲。</p><p>打开<a href="https://university.aliyun.com/">阿里云高校计划</a>（打不开则关闭广告拦截）</p><p><img src="https://lin8177.oss-cn-shenzhen.aliyuncs.com/20250118085343.png"></p><p>完成认证后，选择下方e实例，一年套餐，加入购物车。</p><p><img src="https://lin8177.oss-cn-shenzhen.aliyuncs.com/20250118091945.png"></p><p>地域按距离选择最近的，镜像使用Ubuntu镜像，正常操作后下方应付费用应为0。选择加入购物车，进入购物车并付款，完成购买。</p>]]></content>


    <summary type="html">&lt;h2 id=&quot;领取优惠券&quot;&gt;&lt;a href=&quot;#领取优惠券&quot; class=&quot;headerlink&quot; title=&quot;领取优惠券&quot;&gt;&lt;/a&gt;领取优惠券&lt;/h2&gt;&lt;p&gt;首先，你得是大学牲。&lt;/p&gt;
&lt;p&gt;打开&lt;a href=&quot;https://university.aliyun.com</summary>


    <category term="软件教程" scheme="https://nmsl-blog.pages.dev/categories/%E8%BD%AF%E4%BB%B6%E6%95%99%E7%A8%8B/"/>
    
    
    <category term="软件教程" scheme="https://nmsl-blog.pages.dev/tags/%E8%BD%AF%E4%BB%B6%E6%95%99%E7%A8%8B/"/>
    
  </entry>
  
</feed>